
Leveraging our ProxMox cloud-init templates to deploy VMs entirely through Terraform quickly and easily.
Table of Contents
- Prep a cloud-init template to use with Terraform
- Install Terraform
- Creating authentication for Terraform to make changes to ProxMox via API keys
- Terraform basic initialization and provider installation
- Develop Terraform plan
- Terraform plan
- Run Terraform plan and watch the VMs appear!
- Terraform Destroy
Prep a cloud-init template to use with Terraform
So I will very briefly recap the commands from a previous post that will get you a working cloud init template for ProxMox so that we can use it with Terraform to automate deploying VMs. Please check the previous post if you want more details.
- Download Debian Cloud Image
1
wget https://cloud.debian.org/images/cloud/bullseye/20220613-1045/debian-11-genericcloud-amd64-20220613-1045.qcow2
- Create VM and Convert to Template
1
2
3
4
5
6
7
8
qm create 9500 --name Debian11CloudInit --net0 virtio,bridge=vmbr0
qm importdisk 9500 debian-11-genericcloud-amd64-20220613-1045.qcow2 local-lvm
qm set 9500 --scsihw virtio-scsi-pci --scsi0 local-lvm:vm-9500-disk-0
qm set 9500 --ide2 local-lvm:cloudinit
qm set 9500 --boot c --bootdisk scsi0
qm set 9500 --serial0 socket --vga serial0
qm set 9500 --agent enabled=1
qm template 9500
Install qemu-guest-agent on cloud-init template
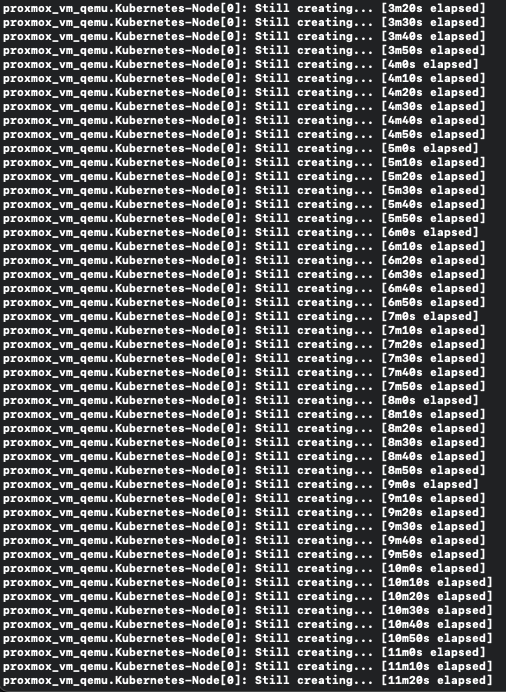
Now there is an issue if you simply leave the cloud-init template with just the commands above. If you call on terraform apply to deploy the VMs using the image without the qemu-guest-agent installed it will forever be stuck “still creating...” as show in the image below.
To resolve this we first need to clone the template we created previously as a VM we can boot and log into to install our qemu-guest-agent
1
qm clone 9500 9000 --name KubernetesNodeTemplate
Start the VM
1
qm start 9000
Log into the VM. I’ll be using an ssh key that I configured with my cloud-init for this template over the network, but you can also simply use the console from the ProxMox Web UI if you set up a password for the default user.
1
ssh -i cloud-init brandon@192.168.2.191
Make sure everything is up to date, install the qemu-guest-agent, then shutdown the VM.
1
2
3
sudo apt update
sudo apt install qemu-guest-agent
sudo shutdown now
With these steps out of the way, we are ready to convert our VM to a template to be used by terraform.
1
qm template 9000
Install Terraform
Now we need to install terraform to our control system if it is not already there.
1
2
3
4
curl -fsSL https://apt.releases.hashicorp.com/gpg | sudo apt-key add -
sudo apt-add-repository "deb [arch=$(dpkg --print-architecture)] https://apt.releases.hashicorp.com $(lsb_release -cs) main"
sudo apt update
sudo apt install terraform
Creating authentication for Terraform to make changes to ProxMox via API keys
There are probably better settings for this section to more securely lock down this user but this will at least get you started with using terraform on ProxMox.
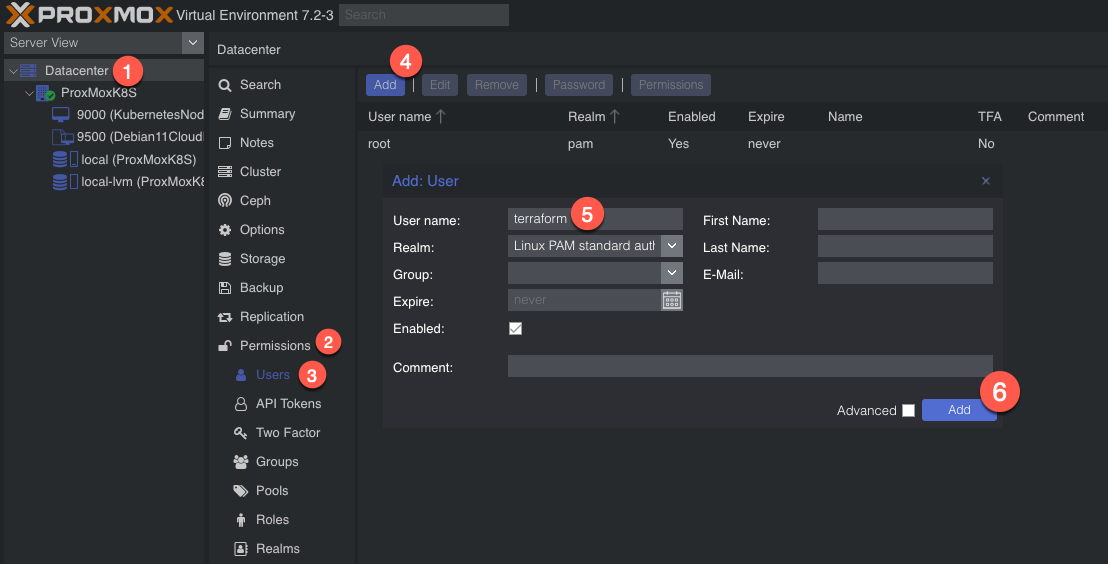
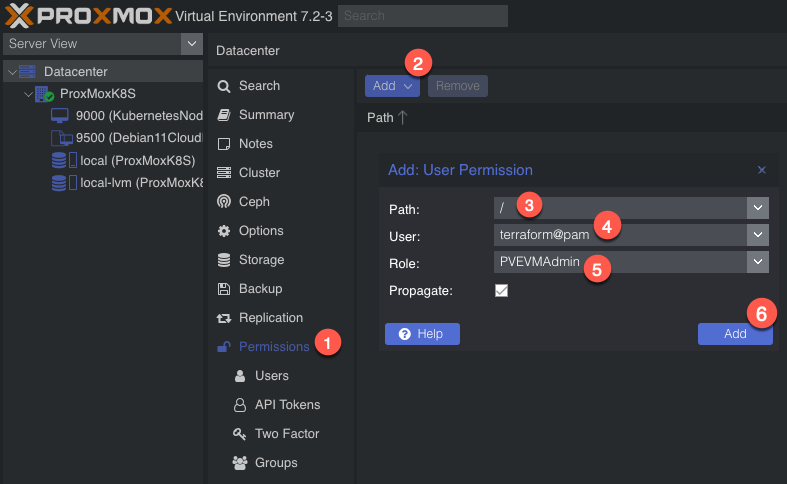
So we need to create a new user. We’ll name it ‘terraform’. To add a new user go to Datacenter in the left tab, then Permissions -> Users -> Click add, name the user and click add.
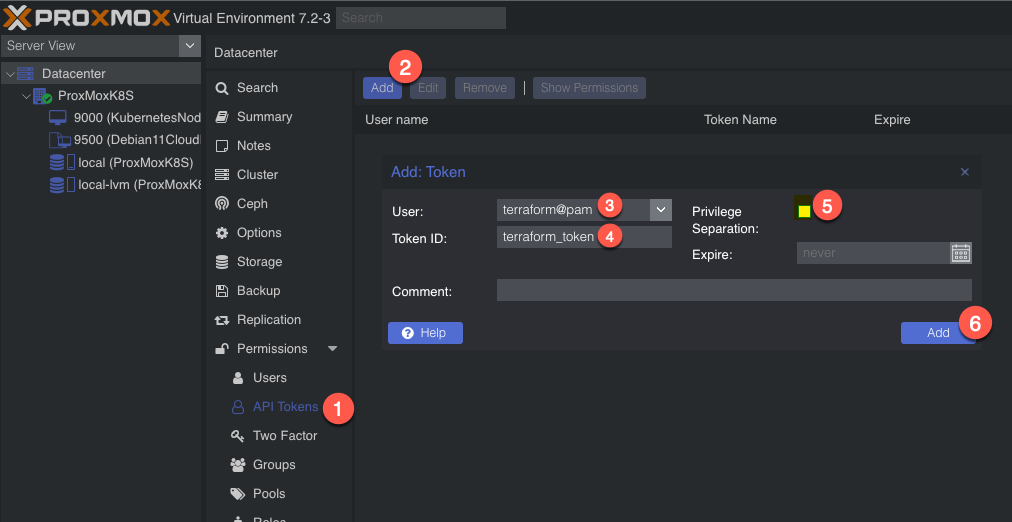
Next, we need to add API tokens. Click API tokens below users in the permissions category and click add. Select the user you just created and give the token an ID, and uncheck privilege separation (which means we want the token to have the same permissions as the user):
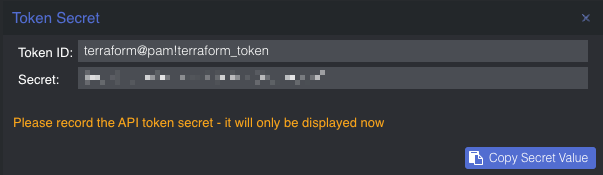
When you click Add it will show you the key. Save this key. It will never be displayed again!
Next we need to add a role to the new user. Permissions -> Add -> Path = ‘/’, User is the one you just made, role = ‘PVEVMAdmin’. This gives the user (and associated API token!) rights to all nodes (the / for path) to do VMAdmin activities:
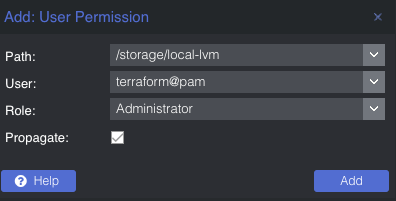
You also need to add permissions to the storage used by the VMs you want to deploy (both from and to), for me this is /storage/local-lvm. Use Admin for the role here because the user also needs the ability to allocate space in the datastore (you could use PVEVMAdmin + a datastore role):
We are now done with the permissions. It is time for Terraform!
Terraform basic initialization and provider installation
Terraform has three main stages: init, plan, and apply. We will start with describing the plans, which can be thought of a a type of configuration file for what you want to do. Plans are files stored in directories. Make a new directory (terraform), and create two files: main.tf and vars.tf:
1
2
3
cd ~
mkdir terraform && cd terraform
touch main.tf vars.tf
The two files are hopefully reasonably named. The main content will be in main.tf and we will put a few variables in vars.tf. Everything could go in main.tf but it is a good practice to start splitting things out early. I actually don’t have as much in vars.tf as I should but we all gotta start somewhere
Ok so in main.tf let’s add the bare minimum. We need to tell Terraform to use a provider, which is the term they use for the connector to the entity Terraform will be interacting with. Since we are using Proxmox, we need to use a Proxmox provider. This is actually super easy – we just need to specify the name and version and Terraform goes out and grabs it from github and installs it. I used the Telmate Proxmox provider.
main.tf:
1
2
3
4
5
6
7
8
terraform {
  required_providers {
    proxmox = {
      source = "telmate/proxmox"
      version = "2.7.4"
    }
  }
}
Save the file. Now we’ll initialize Terraform with our barebones plan (terraform init), which will force it to go out and grab the provider. If all goes well, we will be informed that the provider was installed and that Terraform has been initialized. Terraform is also really nice in that it tells you the next step towards the bottom of the output (“try running ‘terraform plan’ next”).
1
2
3
4
5
6
7
8
9
10
11
12
13
14
15
16
17
18
19
20
21
22
23
24
25
26
27
brandon@ProxMox:~/terraform# terraform init

Initializing the backend...

Initializing provider plugins...
- Finding telmate/proxmox versions matching "2.7.4"...
- Installing telmate/proxmox v2.7.4...
- Installed telmate/proxmox v2.7.4 (self-signed, key ID A9EBBE091B35AFCE)

Partner and community providers are signed by their developers.
If you'd like to know more about provider signing, you can read about it here:
https://www.terraform.io/docs/cli/plugins/signing.html

Terraform has created a lock file .terraform.lock.hcl to record the provider
selections it made above. Include this file in your version control repository
so that Terraform can guarantee to make the same selections by default when
you run "terraform init" in the future.

Terraform has been successfully initialized!

You may now begin working with Terraform. Try running "terraform plan" to see
any changes that are required for your infrastructure. All Terraform commands
should now work.

If you ever set or change modules or backend configuration for Terraform,
rerun this command to reinitialize your working directory. If you forget, other
commands will detect it and remind you to do so if necessary.
Develop Terraform plan
Alright with the provider installed, it is time to use it to deploy a VM. Alter your main.tf file to be the following. I break it down inside the file with comments
main.tf
1
2
3
4
5
6
7
8
9
10
11
12
13
14
15
16
17
18
19
20
21
22
23
24
25
26
27
28
29
30
31
32
33
34
35
36
37
38
39
40
41
42
43
44
45
46
47
48
49
50
51
52
53
54
55
56
57
58
59
60
61
62
#Configure ProxMox provider using Telmate found here https://github.com/Telmate/terraform-provider-proxmox
terraform {
  required_providers {
    proxmox = {
      source = "telmate/proxmox"
      version = "2.7.4"
    }
  }
}
#Configure ProxMox API user/permissions and API url
provider "proxmox" {
  pm_api_url = "https://proxmox:8006/api2/json"

  pm_api_token_id = "terraform@pam!terraform_token"

  pm_api_token_secret = "<your_api_token_secret>"

  pm_tls_insecure = true
}
#Configure Proxmox Resources Here
resource "proxmox_vm_qemu" "Kubernetes-Node" {
  count = 1
  name = "Kubernetes-Node-${count.index + 1}"

  target_node = var.proxmox_host

  clone = var.template_name
  #Basic VM settings here
  agent = 1 # QEMU Guest Agent, 1 means installing the guest agent on this VM is set to True
  os_type = "cloud-init"
  cores = 2
  sockets = 1
  cpu = "host"
  memory = 2048
  scsihw = "virtio-scsi-pci"
  bootdisk = "scsi0"

  disk {
    slot = 0
    # set disk size here. leave it small for testing because expanding the disk takes time.
    size = "10G"
    type = "scsi"
    storage = "local-lvm"
    iothread = 1
  }

  # if you want two NICs, just copy this whole network section and duplicate it
  network {
    model = "virtio"
    bridge = "vmbr0"
  }
  lifecycle {
    ignore_changes = [
      network,
    ]
  }

  # sshkeys set using variables. the variable contains the text of the key.
  sshkeys = <<EOF
  ${var.ssh_key}
  EOF
}
Now for the vars.tf file. This is a bit easier to understand. Just declare a variable, give it a name, and a default value.
vars.tf
1
2
3
4
5
6
7
8
9
10
11
variable "ssh_key" {
  default = "ssh-rsa <your_public_key_here> brandon@ProxMox"
}

variable "proxmox_host" {
    default = "ProxMox"
}

variable "template_name" {
    default = "KubernetesNodeTemplate"
}
Terraform plan
Now with the .tf files completed, we can run the plan (terraform plan). We defined a count=1 resource, so we would expect Terraform to create a single VM. Let’s have Terraform run through the plan and tell us what it intends to do. It tells us a lot.
1
2
3
4
5
6
7
8
9
10
11
12
13
14
15
16
17
18
19
20
21
22
23
24
25
26
27
28
29
30
31
32
33
34
35
36
37
38
39
40
41
42
43
44
45
46
47
48
49
50
51
52
53
54
55
56
57
58
59
60
61
62
63
64
65
66
67
68
69
70
71
72
73
74
75
76
77
78
79
80
81
82
83
84
85
86
87
88
89
brandon@ProxMox:~/terraform# terraform plan

Terraform used the selected providers to generate the following execution plan. Resource actions are indicated with the following symbols:
  + create

Terraform will perform the following actions:

  # proxmox_vm_qemu.Kubernetes-Node[0] will be created
  + resource "proxmox_vm_qemu" "Kubernetes-Node" {
      + additional_wait           = 15
      + agent                     = 1
      + balloon                   = 0
      + bios                      = "seabios"
      + boot                      = "cdn"
      + bootdisk                  = "scsi0"
      + clone                     = "KubernetesNodeTemplate"
      + clone_wait                = 15
      + cores                     = 2
      + cpu                       = "host"
      + default_ipv4_address      = (known after apply)
      + define_connection_info    = true
      + force_create              = false
      + full_clone                = true
      + guest_agent_ready_timeout = 600
      + hotplug                   = "network,disk,usb"
      + id                        = (known after apply)
      + kvm                       = true
      + memory                    = 2048
      + name                      = "Kubernetes-Node-1"
      + nameserver                = (known after apply)
      + numa                      = false
      + onboot                    = true
      + os_type                   = "cloud-init"
      + preprovision              = true
      + reboot_required           = (known after apply)
      + scsihw                    = "virtio-scsi-pci"
      + searchdomain              = (known after apply)
      + sockets                   = 1
      + ssh_host                  = (known after apply)
      + ssh_port                  = (known after apply)
      + sshkeys                   = <<-EOT
              ssh-rsa <your_public_key_here> brandon@ProxMox
        EOT
      + target_node               = "ProxMox"
      + unused_disk               = (known after apply)
      + vcpus                     = 0
      + vlan                      = -1
      + vmid                      = (known after apply)

      + disk {
          + backup       = 0
          + cache        = "none"
          + file         = (known after apply)
          + format       = (known after apply)
          + iothread     = 1
          + mbps         = 0
          + mbps_rd      = 0
          + mbps_rd_max  = 0
          + mbps_wr      = 0
          + mbps_wr_max  = 0
          + media        = (known after apply)
          + replicate    = 0
          + size         = "10G"
          + slot         = 0
          + ssd          = 0
          + storage      = "local-lvm"
          + storage_type = (known after apply)
          + type         = "scsi"
          + volume       = (known after apply)
        }

      + network {
          + bridge    = "vmbr0"
          + firewall  = false
          + link_down = false
          + macaddr   = (known after apply)
          + model     = "virtio"
          + queues    = (known after apply)
          + rate      = (known after apply)
          + tag       = -1
        }
    }

Plan: 1 to add, 0 to change, 0 to destroy.

───────────────────────────────────────────────────────────────────────────────────────────────────────────────────────────────────────────

Note: You didn't use the -out option to save this plan, so Terraform can't guarantee to take exactly these actions if you run "terraform
apply" now.
You can see the output of the planning phase of Terraform. It is telling us it will create proxmox_vm_qemu.Kubernetes-Node[0] with a list of parameters. You can double-check the IP address here, as well as the rest of the basic settings. At the bottom is the summary – “Plan: 1 to add, 0 to change, 0 to destroy.” Also note that it tells us again what step to run next – “terraform apply”.
Run Terraform plan and watch the VMs appear
With the summary stating what we want, we can now apply the plan (terraform apply). Note that it prompts you to type in ‘yes’ to apply the changes after it determines what the changes are. It typically takes 1m15s +/- 15s for my VMs to get created.
If all goes well, you will be informed that 1 resource was added!

Command and full output:
1
2
3
4
5
6
7
8
9
10
11
12
13
14
15
16
17
18
19
20
21
22
23
24
25
26
27
28
29
30
31
32
33
34
35
36
37
38
39
40
41
42
43
44
45
46
47
48
49
50
51
52
53
54
55
56
57
58
59
60
61
62
63
64
65
66
67
68
69
70
71
72
73
74
75
76
77
78
79
80
81
82
83
84
85
86
87
88
89
90
91
92
93
94
95
96
97
98
99
100
101
102
103
104
105
106
brandon@ProxMox:~/terraform# terraform apply

Terraform used the selected providers to generate the following execution plan. Resource actions are indicated with the following symbols:
  + create

Terraform will perform the following actions:

  # proxmox_vm_qemu.Kubernetes-Node[0] will be created
  + resource "proxmox_vm_qemu" "Kubernetes-Node" {
      + additional_wait           = 15
      + agent                     = 1
      + balloon                   = 0
      + bios                      = "seabios"
      + boot                      = "cdn"
      + bootdisk                  = "scsi0"
      + clone                     = "KubernetesNodeTemplate"
      + clone_wait                = 15
      + cores                     = 2
      + cpu                       = "host"
      + default_ipv4_address      = (known after apply)
      + define_connection_info    = true
      + force_create              = false
      + full_clone                = true
      + guest_agent_ready_timeout = 600
      + hotplug                   = "network,disk,usb"
      + id                        = (known after apply)
      + kvm                       = true
      + memory                    = 2048
      + name                      = "Kubernetes-Node-1"
      + nameserver                = (known after apply)
      + numa                      = false
      + onboot                    = true
      + os_type                   = "cloud-init"
      + preprovision              = true
      + reboot_required           = (known after apply)
      + scsihw                    = "virtio-scsi-pci"
      + searchdomain              = (known after apply)
      + sockets                   = 1
      + ssh_host                  = (known after apply)
      + ssh_port                  = (known after apply)
      + sshkeys                   = <<-EOT
              ssh-rsa <your_public_key_here> brandon@ProxMox
        EOT
      + target_node               = "ProxMox"
      + unused_disk               = (known after apply)
      + vcpus                     = 0
      + vlan                      = -1
      + vmid                      = (known after apply)

      + disk {
          + backup       = 0
          + cache        = "none"
          + file         = (known after apply)
          + format       = (known after apply)
          + iothread     = 1
          + mbps         = 0
          + mbps_rd      = 0
          + mbps_rd_max  = 0
          + mbps_wr      = 0
          + mbps_wr_max  = 0
          + media        = (known after apply)
          + replicate    = 0
          + size         = "10G"
          + slot         = 0
          + ssd          = 0
          + storage      = "local-lvm"
          + storage_type = (known after apply)
          + type         = "scsi"
          + volume       = (known after apply)
        }

      + network {
          + bridge    = "vmbr0"
          + firewall  = false
          + link_down = false
          + macaddr   = (known after apply)
          + model     = "virtio"
          + queues    = (known after apply)
          + rate      = (known after apply)
          + tag       = -1
        }
    }

Plan: 1 to add, 0 to change, 0 to destroy.

Do you want to perform these actions?
  Terraform will perform the actions described above.
  Only 'yes' will be accepted to approve.

  Enter a value: yes

proxmox_vm_qemu.Kubernetes-Node[0]: Creating...
proxmox_vm_qemu.Kubernetes-Node[0]: Still creating... [10s elapsed]
proxmox_vm_qemu.Kubernetes-Node[0]: Still creating... [20s elapsed]
proxmox_vm_qemu.Kubernetes-Node[0]: Still creating... [30s elapsed]
proxmox_vm_qemu.Kubernetes-Node[0]: Still creating... [40s elapsed]
proxmox_vm_qemu.Kubernetes-Node[0]: Still creating... [50s elapsed]
proxmox_vm_qemu.Kubernetes-Node[0]: Still creating... [1m0s elapsed]
proxmox_vm_qemu.Kubernetes-Node[0]: Still creating... [1m10s elapsed]
proxmox_vm_qemu.Kubernetes-Node[0]: Still creating... [1m20s elapsed]
proxmox_vm_qemu.Kubernetes-Node[0]: Still creating... [1m30s elapsed]
proxmox_vm_qemu.Kubernetes-Node[0]: Still creating... [1m40s elapsed]
proxmox_vm_qemu.Kubernetes-Node[0]: Still creating... [1m50s elapsed]
proxmox_vm_qemu.Kubernetes-Node[0]: Creation complete after 1m54s [id=ProxMox/qemu/100]

Apply complete! Resources: 1 added, 0 changed, 0 destroyed.
Now go check Proxmox and see if your VM was created: 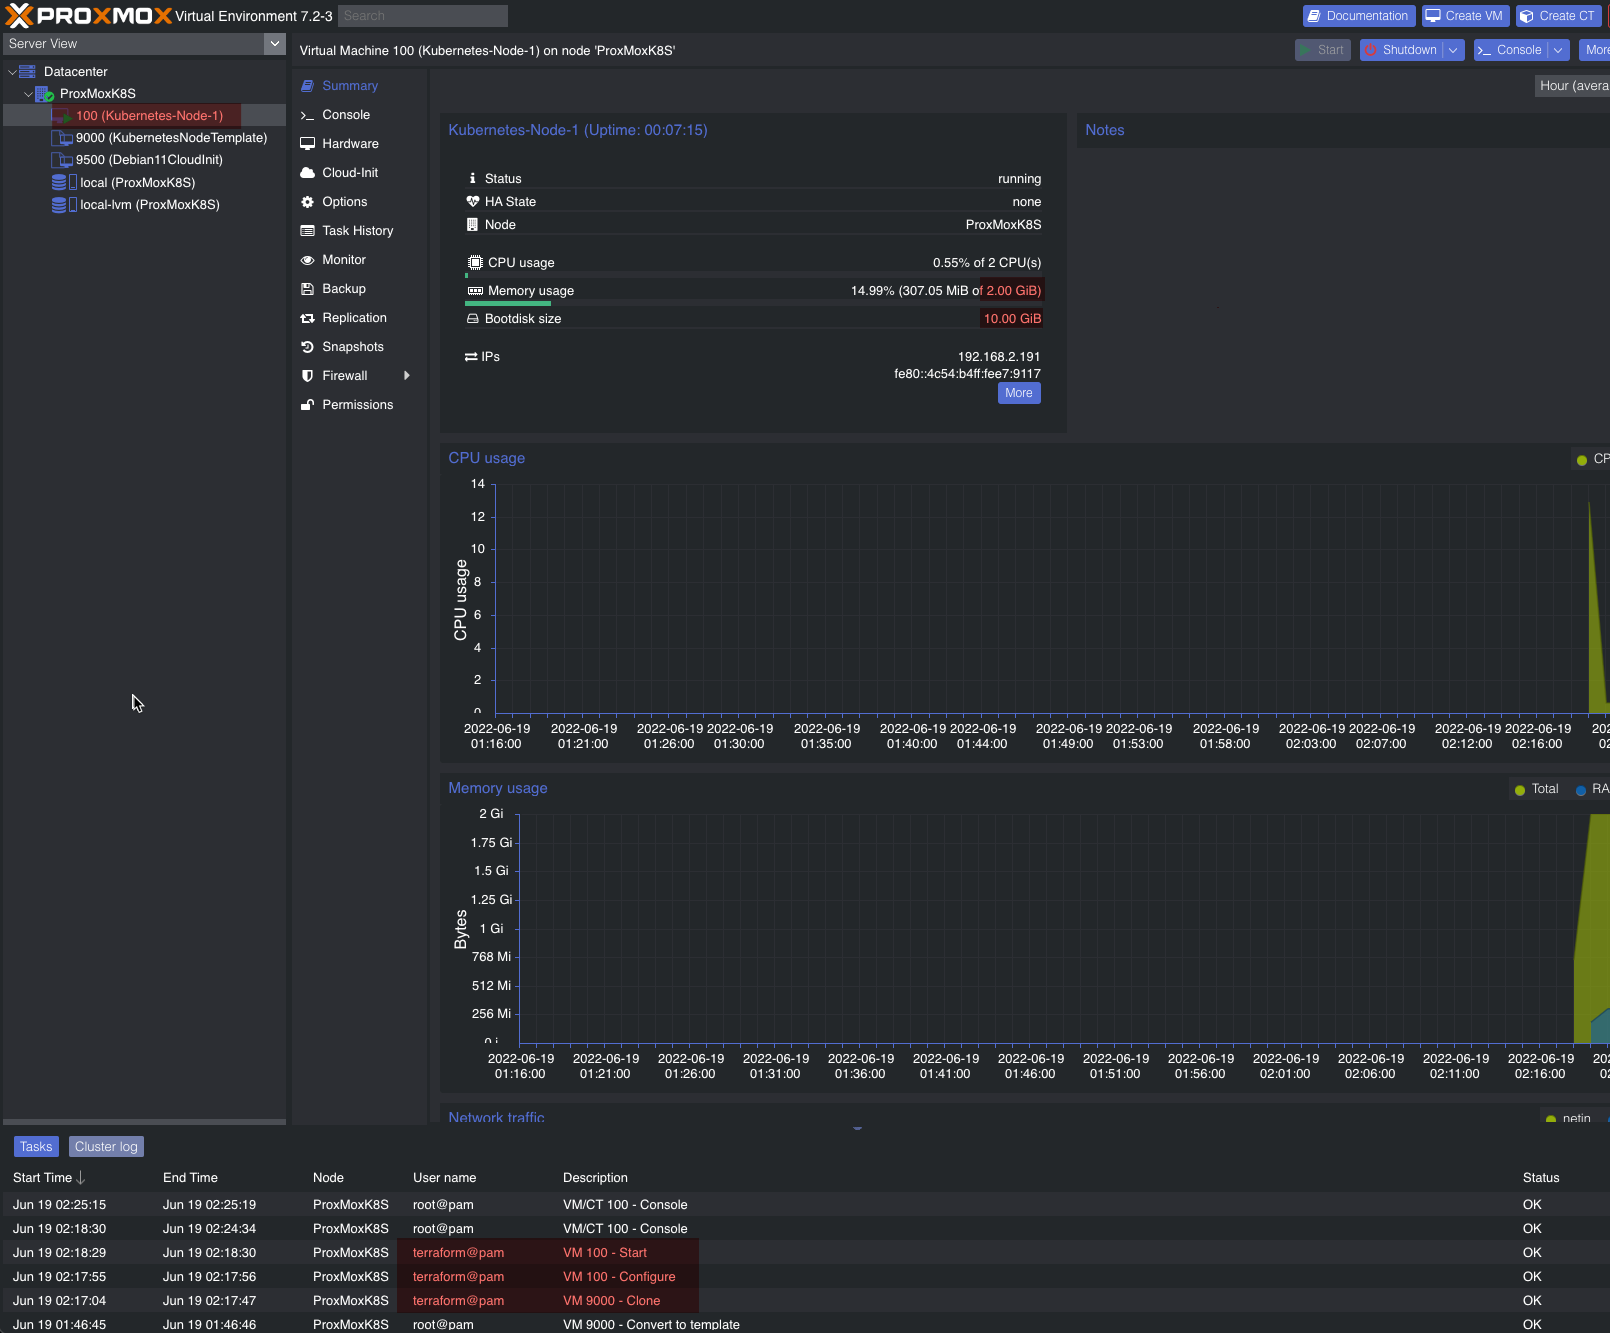
Success! You should now be able to SSH into the new VM with the key you already provided.
Terraform Destroy
To remove a VM or anything created by Terraform with the .tf files we just used, we simply do the reverse of that by using the terraform destroy command.
1
2
3
4
5
6
7
8
9
10
11
12
13
14
15
16
17
18
19
20
21
22
23
24
25
26
27
28
29
30
31
32
33
34
35
36
37
38
39
40
41
42
43
44
45
46
47
48
49
50
51
52
53
54
55
56
57
58
59
60
61
62
63
64
65
66
67
68
69
70
71
72
73
74
75
76
77
78
79
80
81
82
83
84
85
86
87
88
89
90
91
92
93
94
95
96
brandon@ProxMox:~/terraform# terraform destroy
proxmox_vm_qemu.Kubernetes-Node[0]: Refreshing state... [id=ProxMox/qemu/100]

Terraform used the selected providers to generate the following execution plan. Resource actions are indicated with the following symbols:
  - destroy

Terraform will perform the following actions:

  # proxmox_vm_qemu.Kubernetes-Node[0] will be destroyed
  - resource "proxmox_vm_qemu" "Kubernetes-Node" {
      - additional_wait           = 15 -> null
      - agent                     = 1 -> null
      - balloon                   = 0 -> null
      - bios                      = "seabios" -> null
      - boot                      = "cdn" -> null
      - bootdisk                  = "scsi0" -> null
      - ciuser                    = "brandon" -> null
      - clone                     = "KubernetesNodeTemplate" -> null
      - clone_wait                = 15 -> null
      - cores                     = 2 -> null
      - cpu                       = "host" -> null
      - default_ipv4_address      = "192.168.2.191" -> null
      - define_connection_info    = true -> null
      - disk_gb                   = 0 -> null
      - force_create              = false -> null
      - full_clone                = true -> null
      - guest_agent_ready_timeout = 600 -> null
      - hotplug                   = "network,disk,usb" -> null
      - id                        = "ProxMox/qemu/100" -> null
      - kvm                       = true -> null
      - memory                    = 2048 -> null
      - name                      = "Kubernetes-Node-1" -> null
      - numa                      = false -> null
      - onboot                    = true -> null
      - os_type                   = "cloud-init" -> null
      - preprovision              = true -> null
      - qemu_os                   = "other" -> null
      - reboot_required           = false -> null
      - scsihw                    = "virtio-scsi-pci" -> null
      - sockets                   = 1 -> null
      - ssh_host                  = "192.168.2.191" -> null
      - ssh_port                  = "22" -> null
      - sshkeys                   = <<-EOT
              ssh-rsa <your_public_key_here> brandon@ProxMox

        EOT -> null
      - target_node               = "ProxMox" -> null
      - unused_disk               = [] -> null
      - vcpus                     = 0 -> null
      - vlan                      = -1 -> null

      - disk {
          - backup       = 0 -> null
          - cache        = "none" -> null
          - file         = "vm-100-disk-0" -> null
          - format       = "raw" -> null
          - iothread     = 1 -> null
          - mbps         = 0 -> null
          - mbps_rd      = 0 -> null
          - mbps_rd_max  = 0 -> null
          - mbps_wr      = 0 -> null
          - mbps_wr_max  = 0 -> null
          - replicate    = 0 -> null
          - size         = "10G" -> null
          - slot         = 0 -> null
          - ssd          = 0 -> null
          - storage      = "local-lvm" -> null
          - storage_type = "lvmthin" -> null
          - type         = "scsi" -> null
          - volume       = "local-lvm:vm-100-disk-0" -> null
        }

      - network {
          - bridge    = "vmbr0" -> null
          - firewall  = false -> null
          - link_down = false -> null
          - macaddr   = "4E:54:B4:E7:91:17" -> null
          - model     = "virtio" -> null
          - queues    = 0 -> null
          - rate      = 0 -> null
          - tag       = -1 -> null
        }
    }

Plan: 0 to add, 0 to change, 1 to destroy.

Do you really want to destroy all resources?
  Terraform will destroy all your managed infrastructure, as shown above.
  There is no undo. Only 'yes' will be accepted to confirm.

  Enter a value: yes

proxmox_vm_qemu.Kubernetes-Node[0]: Destroying... [id=ProxMoxK8S/qemu/100]
proxmox_vm_qemu.Kubernetes-Node[0]: Destruction complete after 4s

Destroy complete! Resources: 1 destroyed.
