
Managing SSL/TLS certificates for Application Load Balancers (ALBs) can be a complex and time-consuming task, especially in environments where frequent certificate updates are required. However, with the power of AWS services like Amazon S3, AWS Lambda, and AWS Certificate Manager (ACM), we can simplify this process and achieve seamless automation.
In this blog post, we will explore an innovative approach that leverages an S3 bucket as an entry point for dropping SSL/TLS certificate files. Once a certificate is uploaded to the bucket, a Python-based Lambda function is triggered, enabling automatic importation of the certificate into ACM and subsequent application to the ALB. This powerful workflow eliminates the need for manual intervention and streamlines the entire certificate management process.
Table of Contents
- Creating a Certificate
- Configuring a Role for Lambda Execution and Access Permissions
- Creating AWS Lambda Function
- Configure Environment Variables
- Configure S3 Bucket Trigger
- Testing The Final Product
Creating a Certificate
To successfully import a certificate into AWS Certificate Manager (ACM), it is crucial to ensure that the certificate file dropped into the S3 bucket contains the necessary components in the correct format. ACM requires both the private key and the certificate body to be included for proper importation.
Let’s take a closer look at these two components:
Private Key: The private key is a crucial part of the SSL/TLS certificate. It is a securely generated cryptographic key that remains confidential and should never be shared publicly. The private key is used to decrypt encrypted communication between the client and the server.
Certificate Body: The certificate body, often referred to as the public key certificate, contains the public key itself along with other information, such as the domain name, expiration date, and issuer details. It is a digitally signed file that serves as proof of the authenticity and ownership of the certificate.
To quickly and easily generate a cert, we can use an online tool such as Certificate Tools
For testing purposes we are going to remove all attributes except the common name.
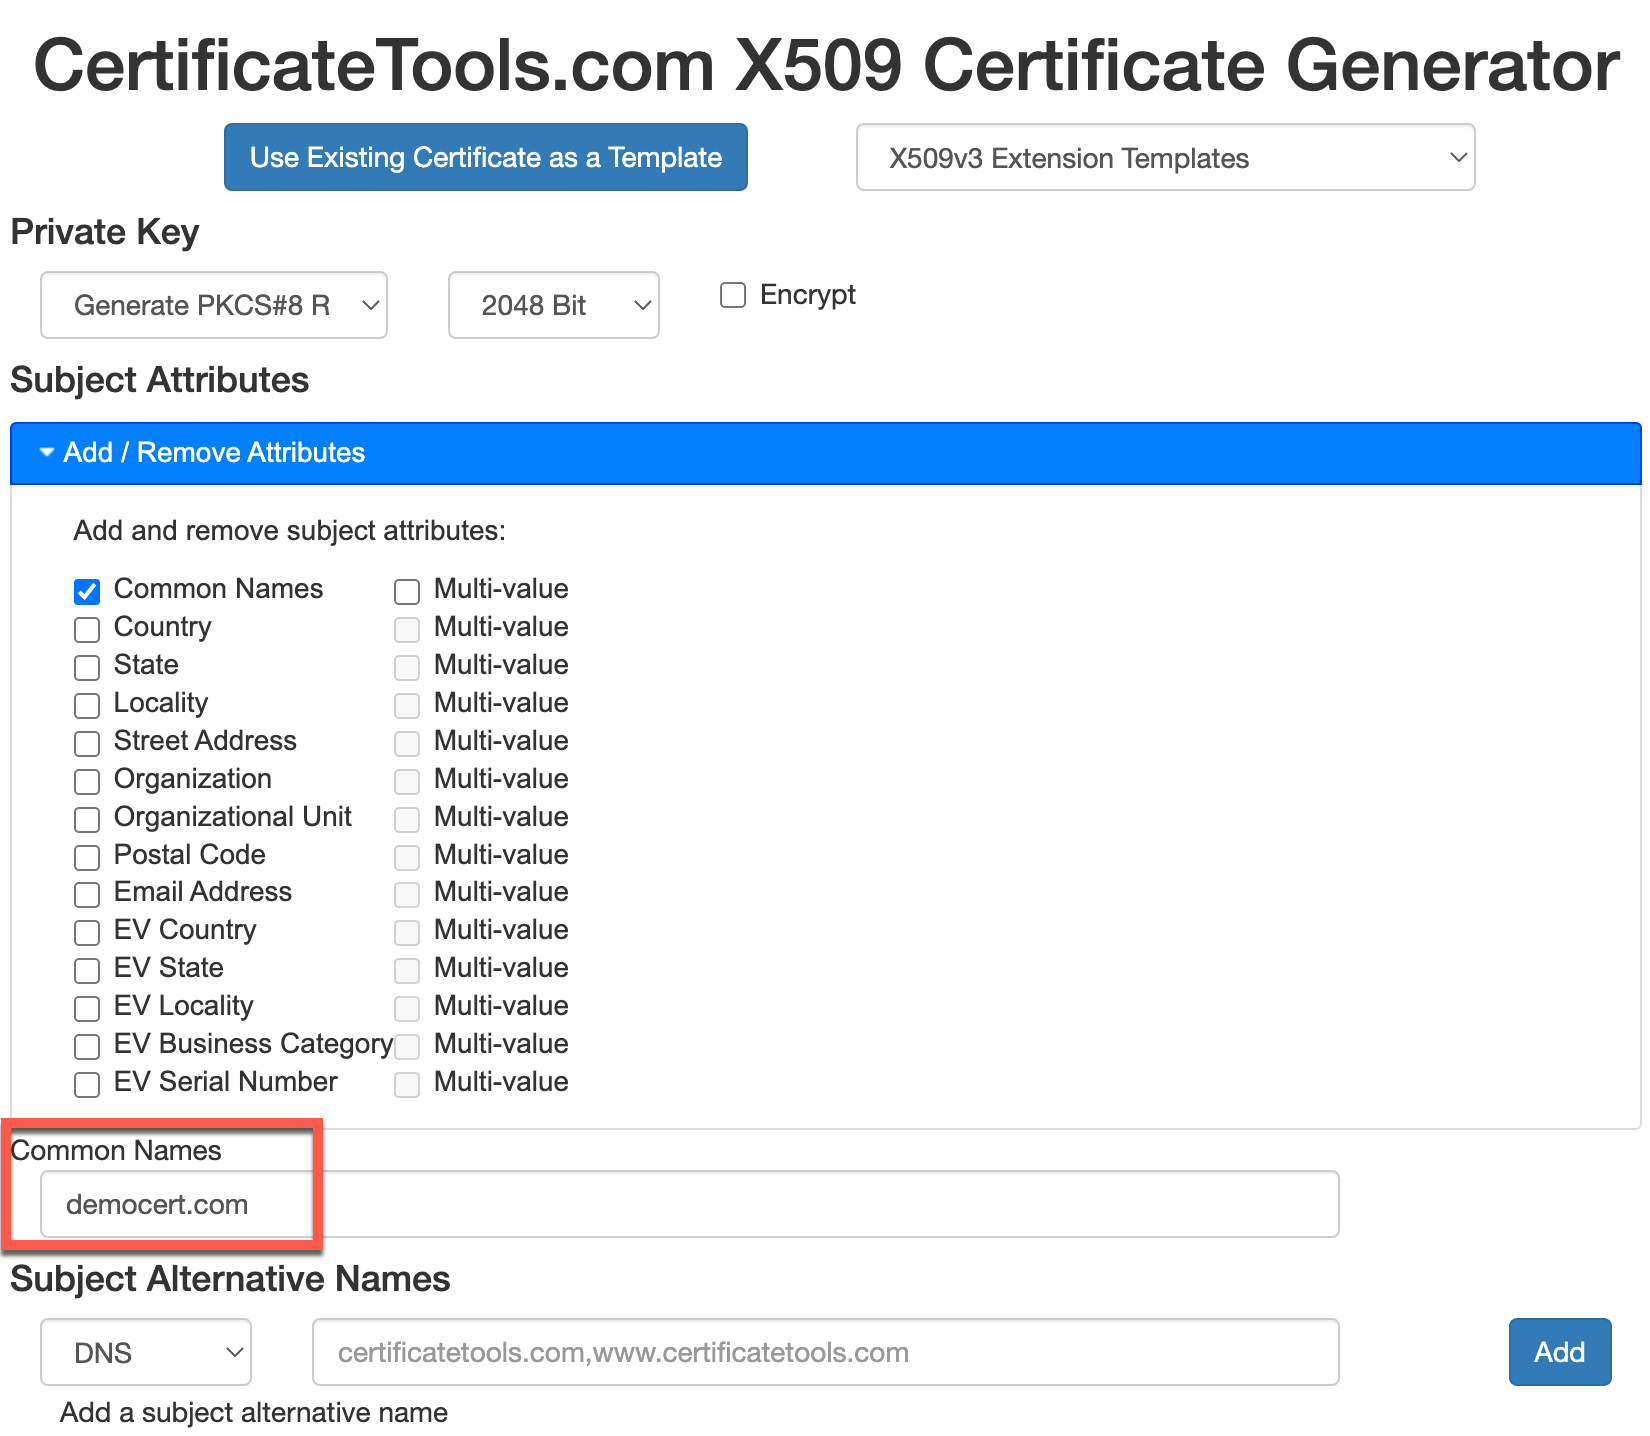
Note: By including SANs (Subject Alternate Name) in your certificate, you can secure multiple domain names and subdomains under a single certificate. This eliminates the need for managing separate certificates for each individual domain or subdomain, streamlining your certificate management process and reducing administrative overhead. With a SAN-enabled certificate, you can protect www.example.com, blog.example.com, api.example.com, and more, all with a single certificate.
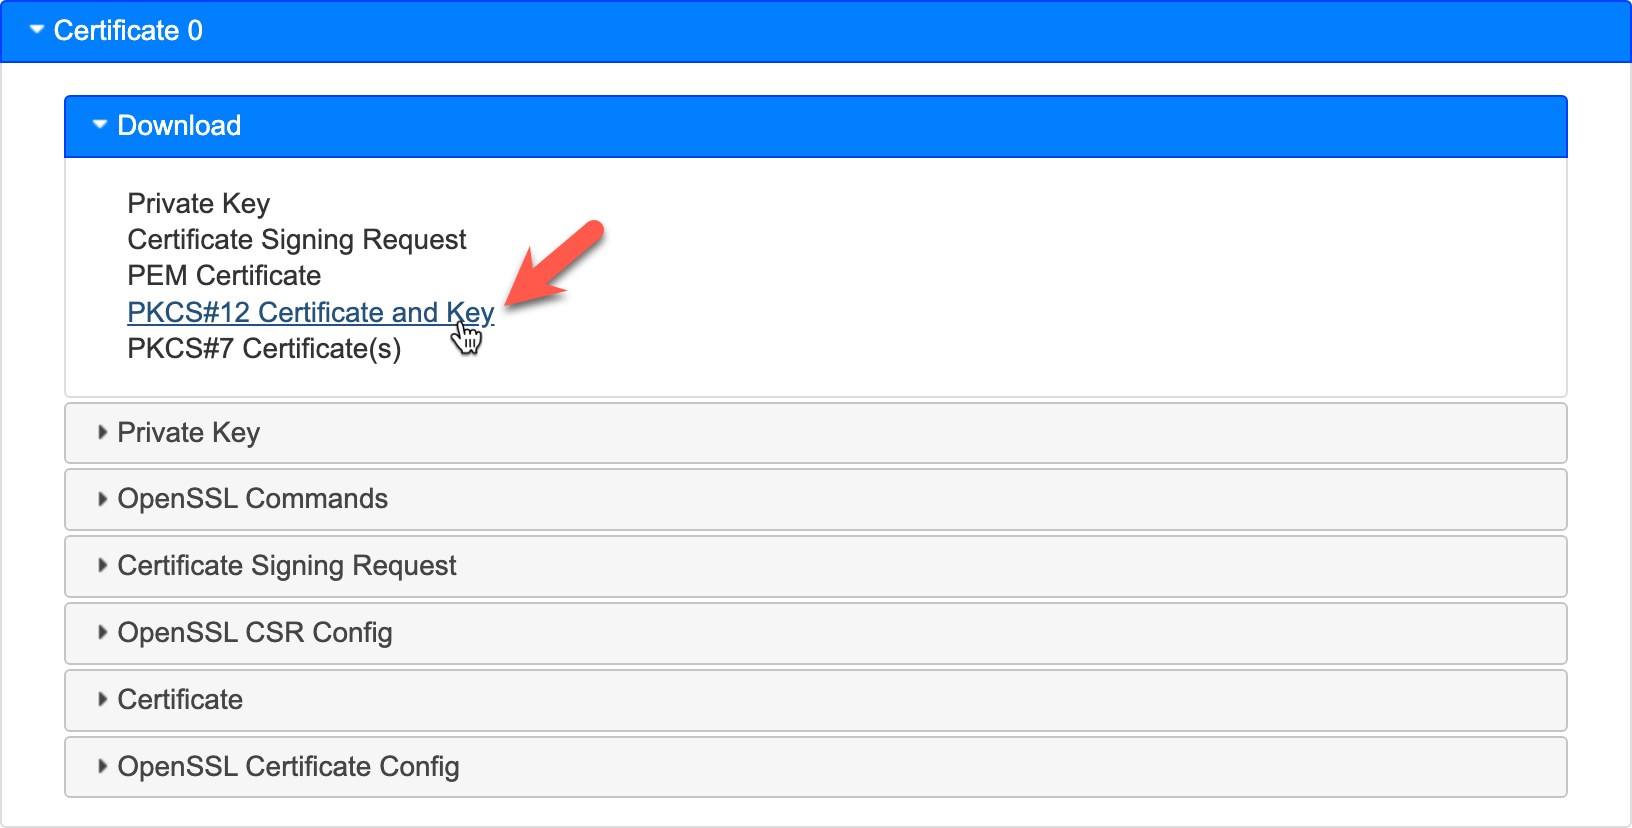
Now that the cert has been generated, we can download our .pfx formatted file by going to download and clicking on PKCS#12 Certificate and Key.
Once you have your .pfx file downloaded we can open our terminal and run the following command to convert it from .pfx to .pem containing both or Certificate Body and Private Key
1
openssl pkcs12 -in democert.pfx -out democert.pem -nodes
Here’s a breakdown of the command and its options:
- pkcs12: This specifies the PKCS#12 file format.
- in democert.pfx: This option specifies the input file, democert.pfx, which is the PKCS#12 file you want to convert.
- out democert.pem: This option specifies the output file, democert.pem, which is the resulting PEM file after the conversion.
- nodes: This option instructs OpenSSL to output the private key without encryption. Without this option, the private key in the PEM file would be encrypted with a passphrase.
By using this command, you can convert a PKCS#12 file (democert.pfx) to a PEM file (democert.pem) while preserving the private key without encryption. The resulting PEM file can be more easily used in various applications that require certificates and private keys in the PEM format, such as web servers, load balancers, or other SSL/TLS-enabled services.
Note: This command will prompt you for a password. Just leave it blank and press
Enterand it will be fine as long as you did not enter a password when you downloaded the file.

You’re .pem file is now ready for upload! We have both the Certificate Body and the Private Key that is necessary for ACM to import correctly in AWS.
Configuring a Role for Lambda Execution and Access Permissions
To ensure the smooth execution of our solution, it is crucial to configure an AWS Identity and Access Management (IAM) role with the appropriate permissions. This role will grant the Lambda function the necessary access to the various AWS resources involved, including the S3 bucket, Lambda execution, ALB, and ACM.
Here are the key permissions that should be included in the IAM role:
S3 Bucket Permissions: Grant read access to the Lambda function so it can retrieve the certificate file from the designated S3 bucket. The IAM policy should include the s3:GetObject permission for the specific S3 bucket and object used for certificate storage.
Lambda Execution Permissions: Provide the Lambda function with the required execution permissions. This includes permissions such as lambda:InvokeFunction, lambda:GetFunction, and lambda:UpdateFunctionConfiguration to allow the Lambda function to be invoked, retrieve its configuration, and update it when needed.
ACM Permissions: Allow the Lambda function to interact with ACM to import the certificate and access relevant ACM operations. This typically involves permissions such as acm:ImportCertificate and acm:DescribeCertificate.
ALB Permissions: Grant the Lambda function the necessary permissions to interact with the Application Load Balancer. This includes permissions such as elasticloadbalancing:AddListenerCertificates to enable the addition of the imported certificate to the ALB listener.
Remember to follow the principle of least privilege when defining the permissions for the IAM role; However, for the sake of this post, I may not follow this principle so closely. “Do what I say, not what I do.”
I am using a combination of Policies on my role.
- AWSLambdaBasicExecutionRole (AWS Managed)
- AWSCertificateManagerFullAccess (AWS Managed)
- alb-and-s3-access (Custom)
- AllowAddingCertToSNI (Custom)

I provide the JSON I am using for my two custom policies.
alb-and-s3-access
1
2
3
4
5
6
7
8
9
10
11
12
13
14
15
16
17
18
19
20
21
22
23
24
25
26
27
28
29
30
31
32
33
34
35
36
37
38
39
{
    "Version": "2012-10-17",
    "Statement": [
        {
            "Effect": "Allow",
            "Action": [
                "s3:GetObject",
                "s3:GetBucketLocation"
            ],
            "Resource": [
                "arn:aws:s3:::<your-s3-bucket-name>/*",
                "arn:aws:s3:::<your-s3-bucket-name>"
            ]
        },
        {
            "Effect": "Allow",
            "Action": [
                "acm:ListCertificates",
                "acm:DescribeCertificate"
            ],
            "Resource": "*"
        },
        {
            "Effect": "Allow",
            "Action": [
                "iam:PassRole"
            ],
            "Resource": "arn:aws:iam::<your-account-ID>:role/alb-cert-automation-lambda-role"
        },
        {
            "Effect": "Allow",
            "Action": [
                "elasticloadbalancing:CreateListener",
                "elasticloadbalancing:DescribeLoadBalancers"
            ],
            "Resource": "arn:aws:elasticloadbalancing:us-east-2:<your-account-ID>:loadbalancer/app/appteam-certs/653d3cd5b730fcee"
        }
    ]
}
AllowAddingCertToSNI
1
2
3
4
5
6
7
8
9
10
11
12
13
14
{
    "Version": "2012-10-17",
    "Statement": [
        {
            "Effect": "Allow",
            "Action": [
                "elasticloadbalancing:AddListenerCertificates"
            ],
            "Resource": [
                "arn:aws:elasticloadbalancing:us-east-2:<your-account-ID>:listener/app/appteam-certs/653d3cd5b730fcee/66c6fe7f9aa68257"
            ]
        }
    ]
}
Creating AWS Lambda Function
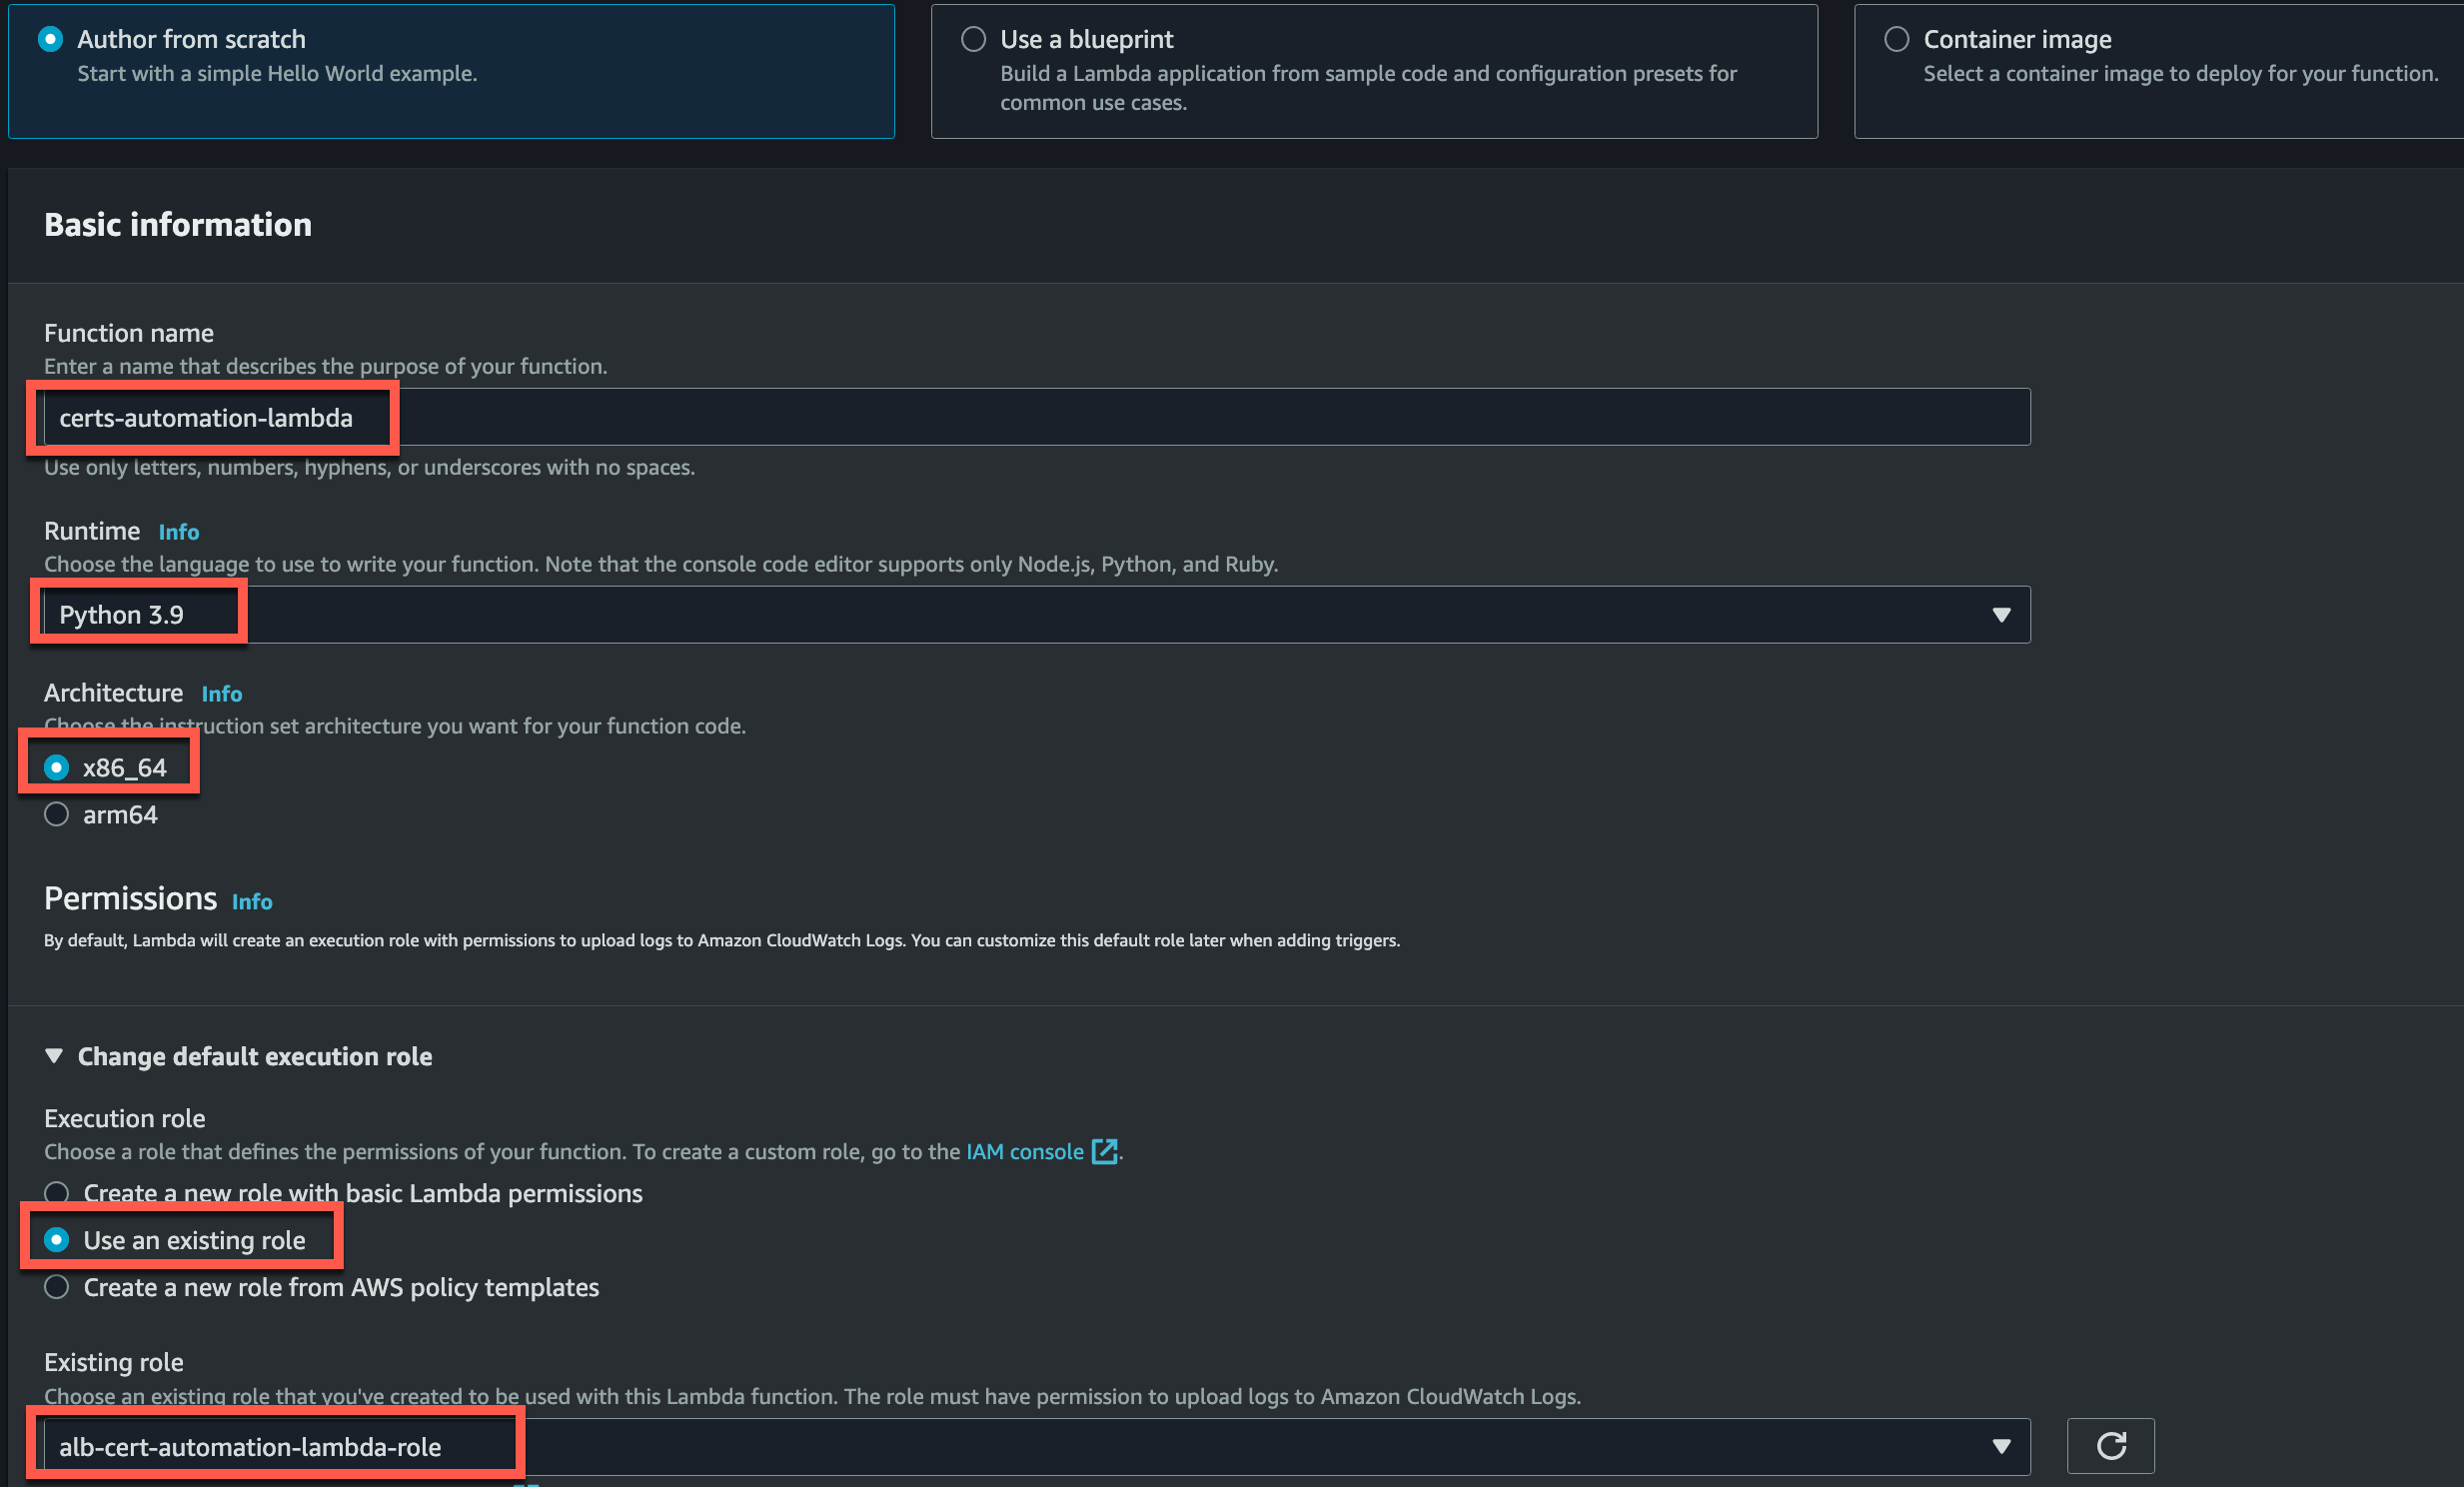
It’s time to make our Lambda Function. Here are the key pieces to pay attention to when creating your Lambda:
- Function Name: Whatever works for you
- Runtime: Python 3.9
- Architecture: x86_64
- Use an Existing Role
- Existing Role: alb-cert-automation-lambda-role (This is the role we created with the proper permissions)
The hard part is going to be writing the actual Python script for our solution; but don’t worry I already have that part figured out!
1
2
3
4
5
6
7
8
9
10
11
12
13
14
15
16
17
18
19
20
21
22
23
24
25
26
27
28
29
30
31
32
33
34
35
36
37
38
39
40
41
42
43
44
45
46
47
48
49
50
51
import boto3
import os
from cryptography import x509
from cryptography.hazmat.primitives import serialization
from cryptography.hazmat.primitives.asymmetric import rsa

# Initialize the AWS SDK clients
s3_client = boto3.client('s3')
elbv2_client = boto3.client('elbv2')
acm_client = boto3.client('acm')

def lambda_handler(event, context):
    # Get the S3 bucket name and file key from the event
    s3_bucket = event['Records'][0]['s3']['bucket']['name']
    s3_key = event['Records'][0]['s3']['object']['key']

    # Download the certificate file from S3
    certificate_data = s3_client.get_object(Bucket=s3_bucket, Key=s3_key)['Body'].read()

    # Extract the certificate and private key
    cert = x509.load_pem_x509_certificate(certificate_data)
    private_key = serialization.load_pem_private_key(certificate_data, password=None)

    # Convert the certificate to PEM format
    certificate = cert.public_bytes(encoding=serialization.Encoding.PEM)

    # Upload the certificate to ACM
    certificate_arn = acm_client.import_certificate(
        Certificate=certificate,
        PrivateKey=private_key.private_bytes(
            encoding=serialization.Encoding.PEM,
            format=serialization.PrivateFormat.TraditionalOpenSSL,
            encryption_algorithm=serialization.NoEncryption(),
        ),
    )['CertificateArn']

    # Update the ALB listener with the new certificate
    listener_arn = os.environ['LISTENER_ARN']  # Get the listener ARN from environment variable
    certificates = [{
        'CertificateArn': certificate_arn,
    }]

    response = elbv2_client.add_listener_certificates(
        ListenerArn=listener_arn,
        Certificates=certificates
    )

    return {
        'statusCode': 200,
        'body': 'Certificate updated successfully'
    }
For the curious minds out there; Let’s break down the code and understand its functionality:
The necessary imports are done, including boto3 for AWS SDK client initialization, os for accessing environment variables, and cryptography for certificate and private key operations.
The AWS SDK clients (S3, ELBV2, ACM) are initialized using boto3.client().
The lambda_handler function is the entry point for the Lambda function. It takes event and context parameters.
The S3 bucket name and file key are extracted from the event parameter, which contains information about the S3 object creation event that triggered the Lambda function.
The certificate file is downloaded from S3 using s3_client.get_object().
The certificate and private key are extracted from the downloaded file using the load_pem_x509_certificate() and load_pem_private_key() methods from the cryptography library.
The certificate is converted to PEM format using the public_bytes() method.
The certificate is imported into AWS Certificate Manager (ACM) using acm_client.import_certificate(). The certificate is provided in PEM format, and the private key is serialized and provided as well.
The ALB listener ARN is retrieved from an environment variable.
The new certificate is added to the ALB listener using elbv2_client.add_listener_certificates().
The Lambda function returns a response indicating the successful update of the certificate.
Note that proper configuration and setup of the necessary AWS resources, permissions, and environment variables are required for this code to function correctly in your specific AWS environment.
Configure Environment Variables
Because the code will look to the Lambda function to retrieve the ALB ARN, we will need to add it to the Environment Variables.
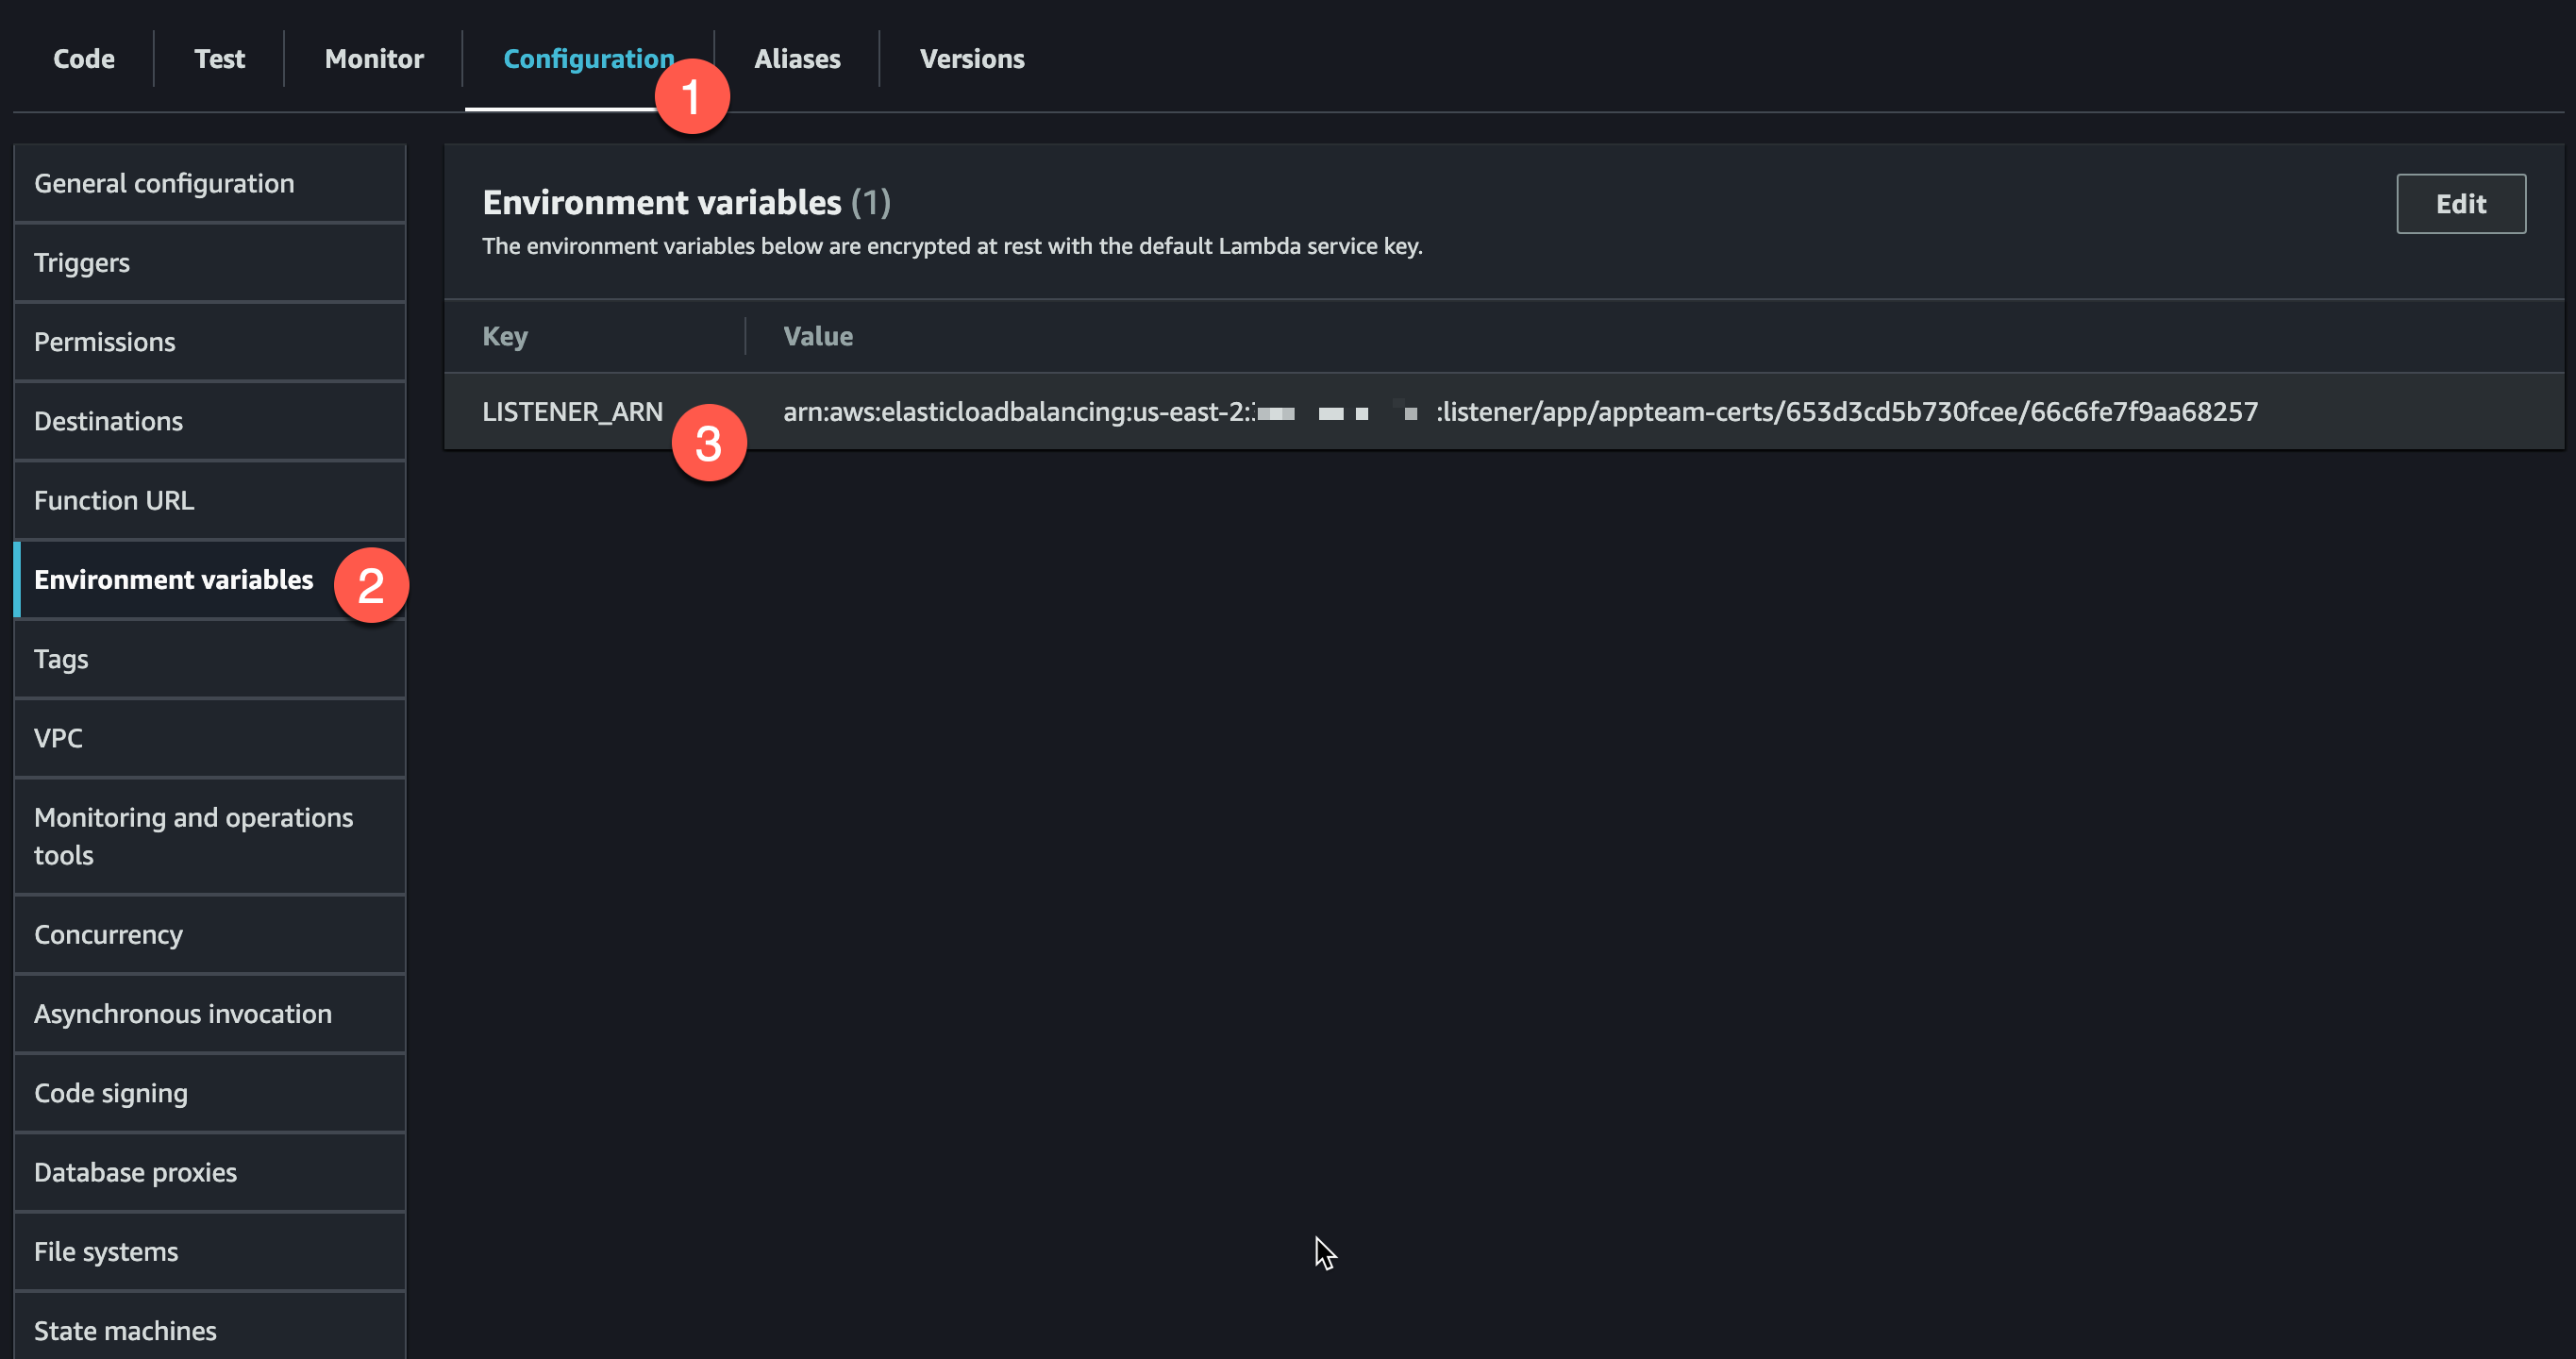
To find the correct ARN for this Environment Variable, head over to EC2 -> Load Balancers -> Your ALB -> Your Listener
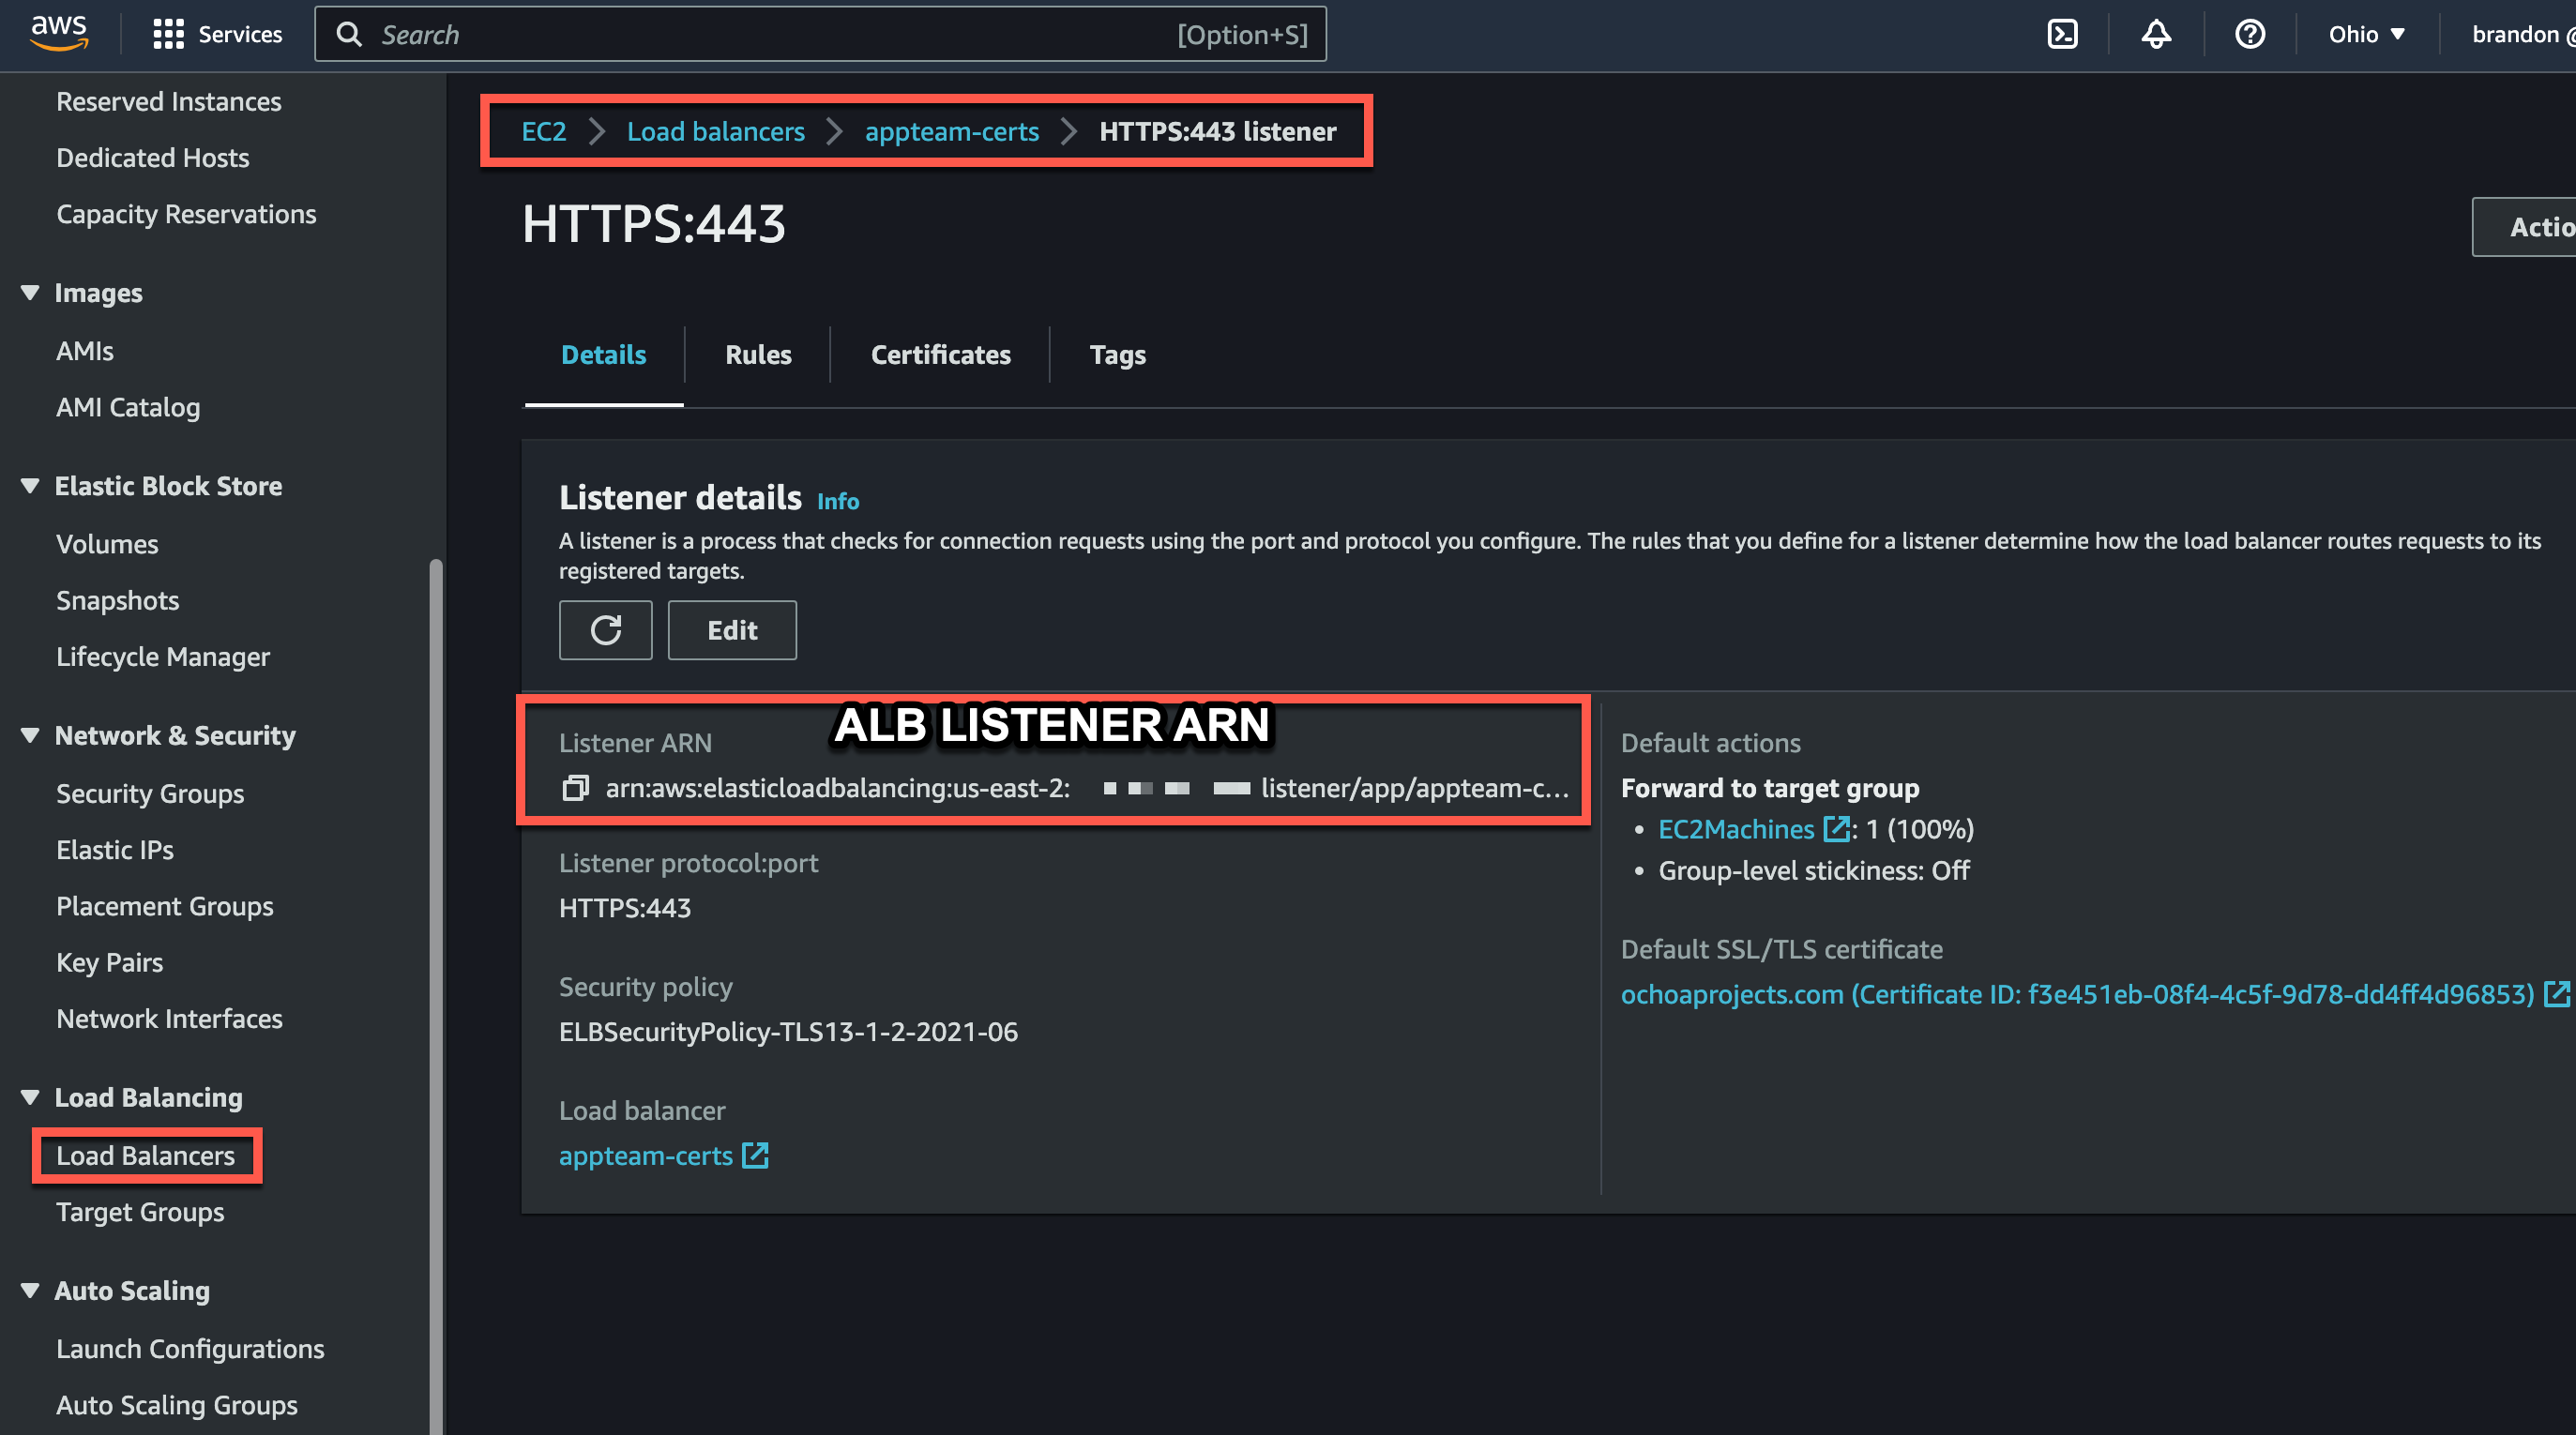
At this point you may have been wondering about how we have multiple certs on the ALB at all. With an ALB we have one default cert. This default cert takes effect when we are targeting that domain of the default cert when making requests to our ALB or if there is no SNI (Server Name Indication) in our request when it hits the ALB. When it comes to SSL/TLS termination and handling HTTPS traffic, ALB listeners play a crucial role. ALB listeners support Server Name Indication (SNI), which allows the ALB to handle multiple SSL/TLS certificates for different domains or subdomains on a single IP address. This enables the ALB to route traffic to the appropriate target based on the requested domain or hostname.
Lambda Layer
For this Lambda function we will also be using the following Python libraries:
- boto3: Boto3 is a Python library that provides an interface to interact with AWS services, allowing developers to automate and manage cloud resources programmatically.
- os: The “os” library is a built-in Python module that provides functions for interacting with the operating system, enabling tasks such as file operations, environment variables access, and process management.
- cryptography: The “cryptography” library is a Python package that offers cryptographic primitives, such as encryption, decryption, and key generation, allowing developers to secure data and communications in their applications.
We will create the lambda layer the same way as referenced in Using AWS Lambda and API Gateway to Check URLs post. Please follow the link for the steps.
For the completed lambda layer for this project, here is the download link: lambdalayer.zip
Configure S3 Bucket Trigger
I’ll assume here that you know how to create an S3 bucket in AWS. Here I will simply show you how you add the S3 bucket trigger for the Lambda Function.
Simply click add event while you are in the Lambda function. Choose S3 as the source. You can search for this. Next choose your S3 bucket from the drop down. This is all that needs to be changed, but not that the default setting here should also have “All object create events” which is what we want.

Testing The Final Product
OKAY! Now we have all the pieces required for our solution.
- A cert in
.pemformat containing both ourCertificate BodyandPrivate Key - Role with proper permissions including the S3 bucket, Lambda execution, ALB, and ACM.
- AWS Python Lambda Function with Code that will extract cert content, import to ACM, and then add cert arn to the ALB listener.
- Environment Variable set
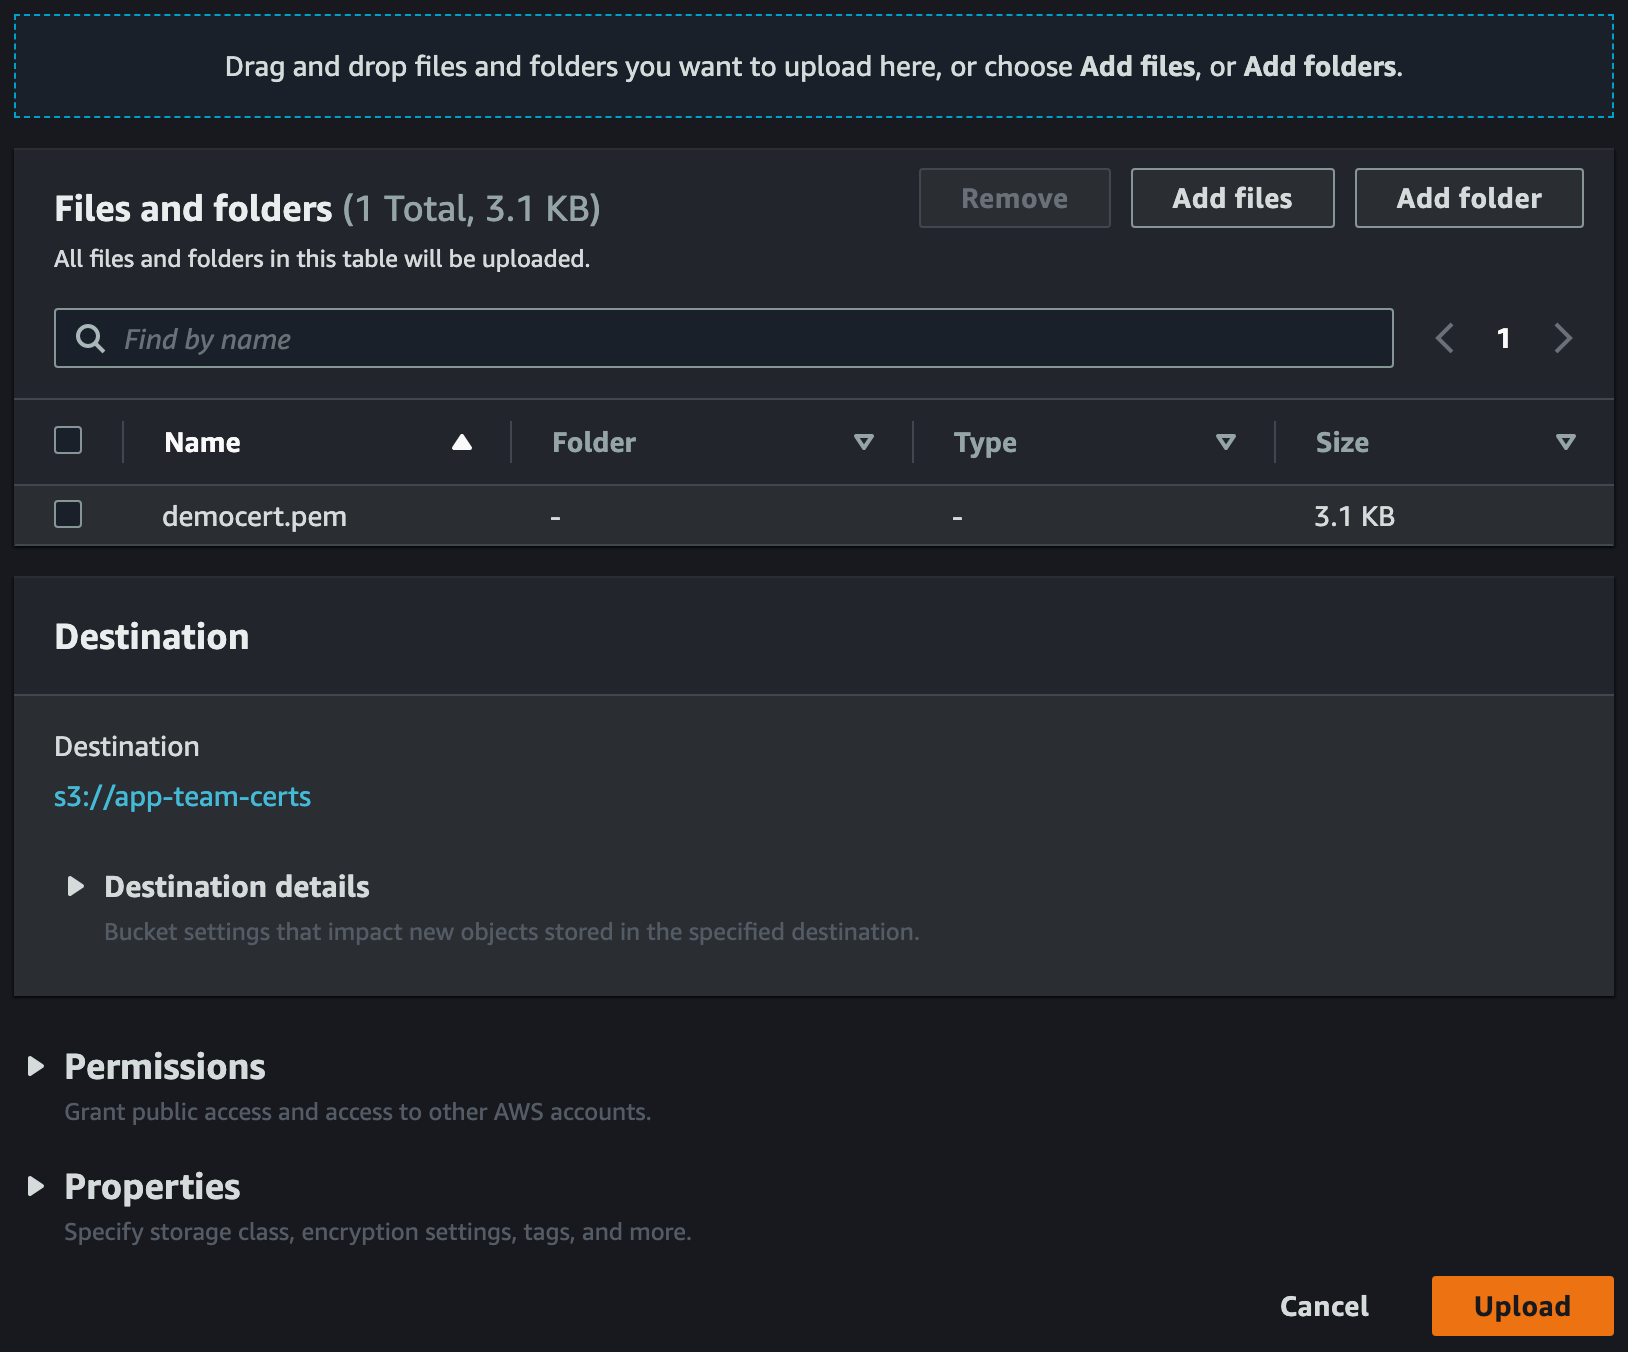
Let’s try adding our democert.pem to the S3 Bucket.
Now let’s check that our cert was uploaded to ACM

Now let’s check that our cert was added to the ALB Listener
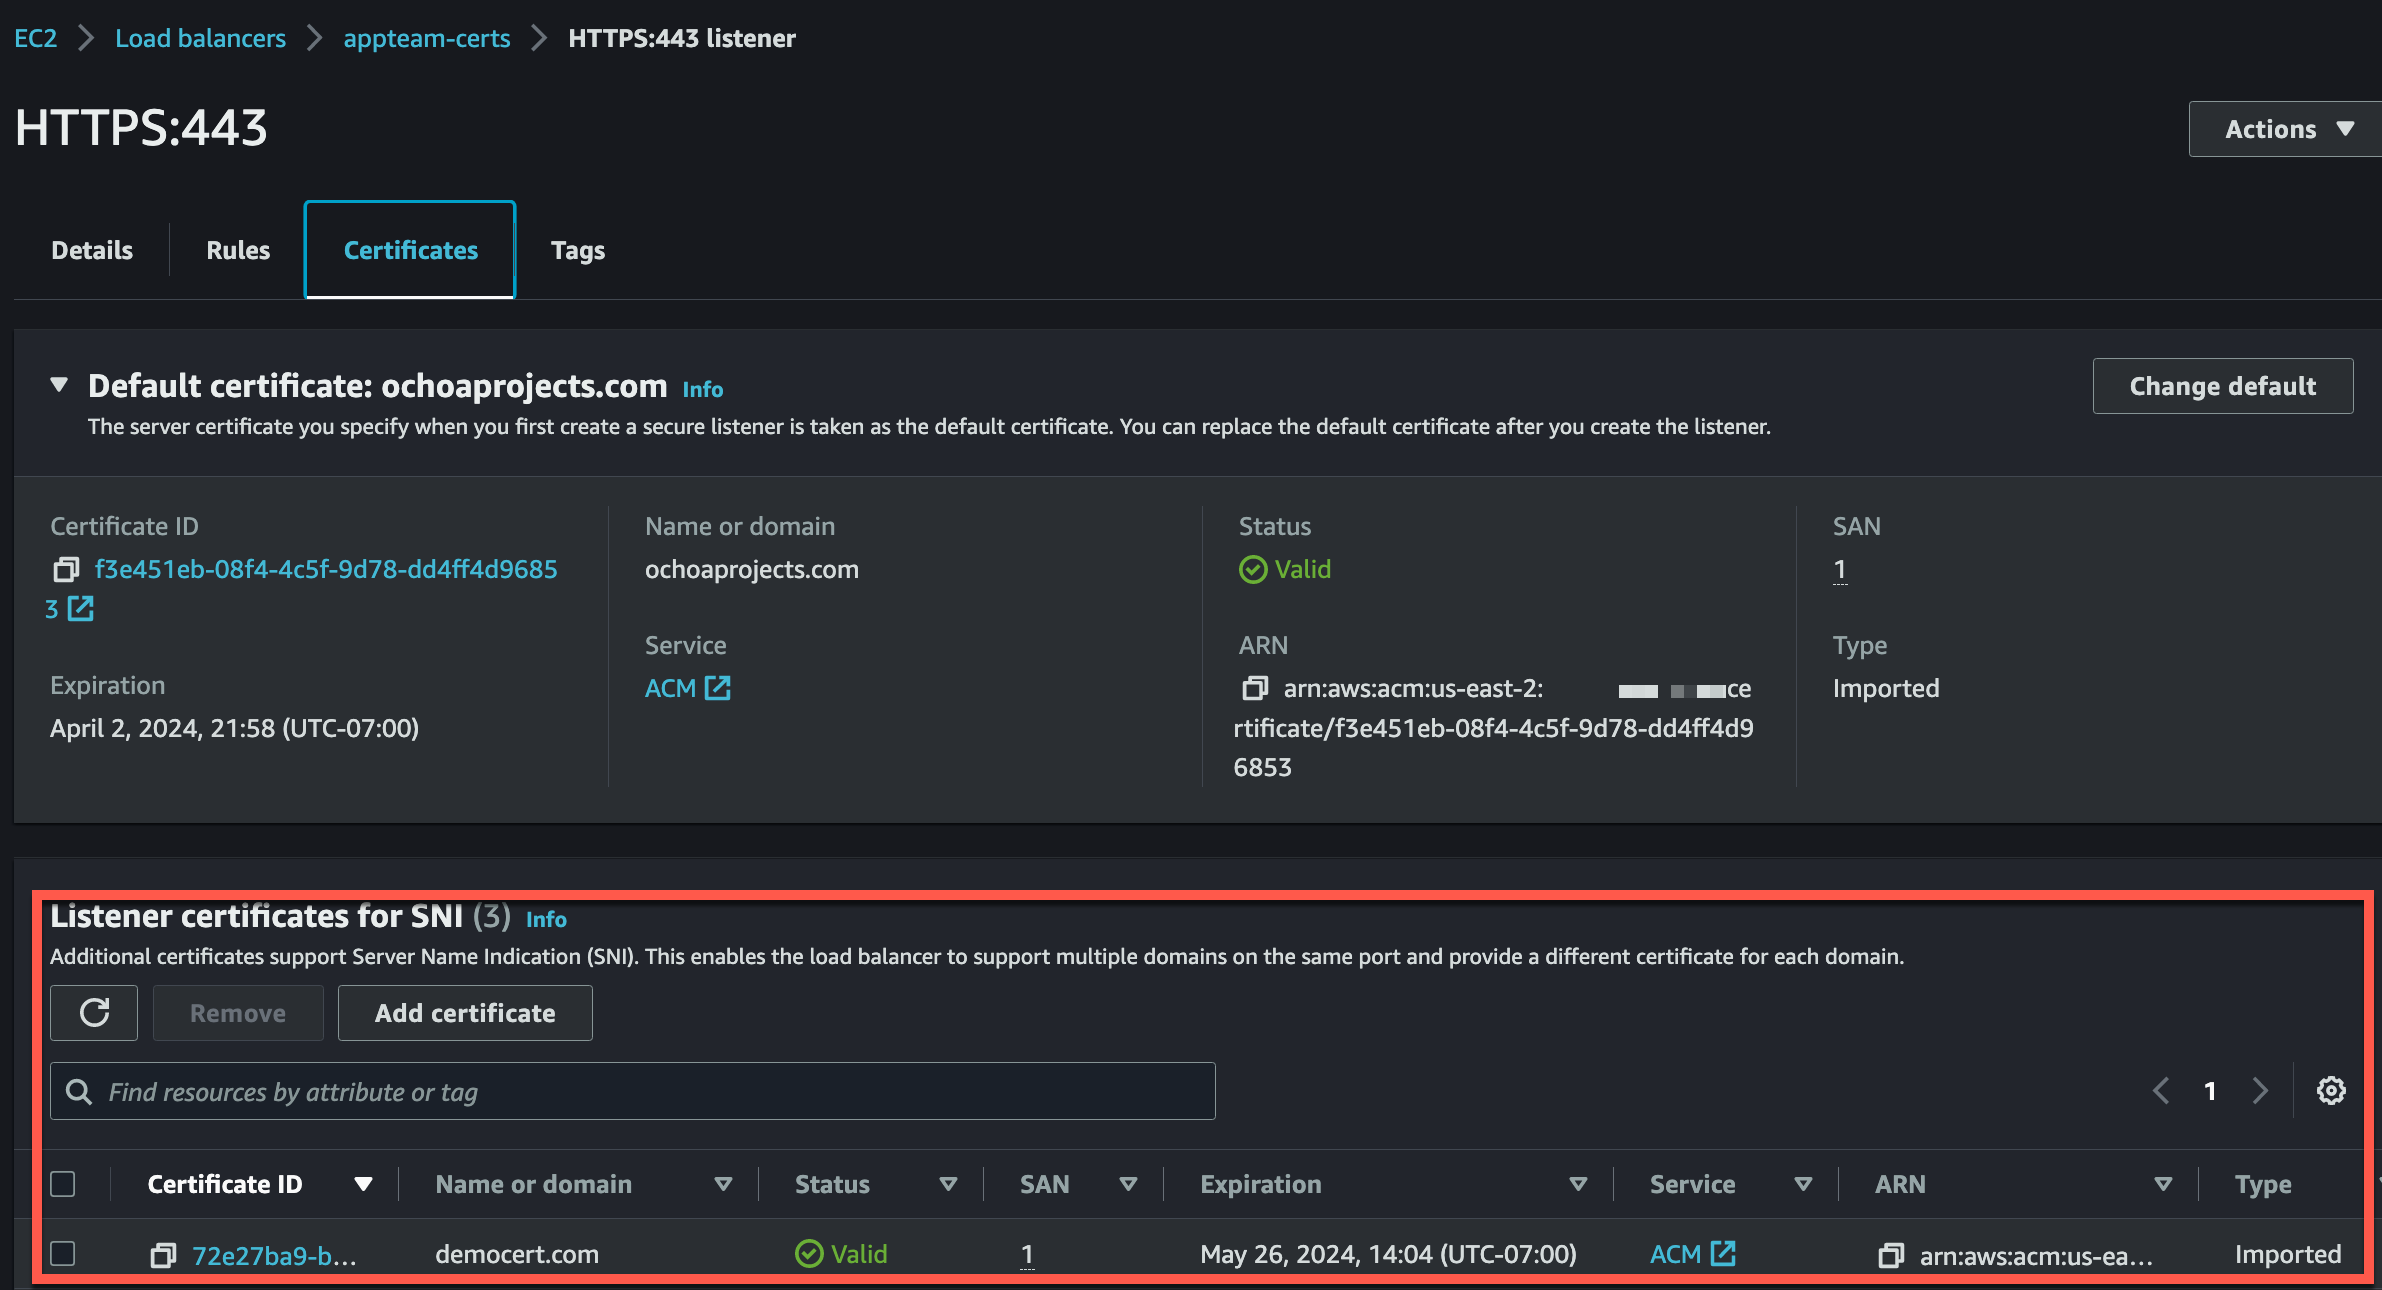
Perfect!