
Terraform is a powerful tool that allows us to automate infrastructure in our cloud providers and much more. Using terraform to automate the building and configuration of our AWS enviornment to be in the exact state we want it to be is not only a huge time saver, but also ensures we are not making a mistake each time we deploy it.
Table of Contents
- Starting our project and setting a provider
- Create a Key Pair
- Create VPC
- Create Internet Gateway
- Create a Subnet
- Create Custom Route Table
- Associate Subnet with Route Table
- Create Security Group to Allow Port Web Traffic and SSH
- Create a Network Interface with an IP in the Subnet
- Assign an Elastic IP to the Network Interface
- Create Debian Server then Install and Enable Apache2
- Terraform Plan
- Terraform Apply
- Checking the Results
- Terraform Destory
- Completed main.tf File
Starting our project and setting a provider
Terraform uses .tf files. We will start off by creating our main.tf file.
1
touch main.tf
Note: Putting all code in main.tf is a good idea when you are getting started or writing an example code. In all other cases you will be better having several files split logically like this:
main.tf- call modules, locals, and data sources to create all resourcesvariables.tf- contains declarations of variables used in main.tfoutputs.tf- contains outputs from the resources created in main.tfversions.tf- contains version requirements for Terraform and providersterraform.tfvarsshould not be used anywhere except composition.
To learn more of the best practices visit the Terraform Best Practices Website
We will need to setup up our provider on the machine we will be running our terraform code on. In this case it will be AWS. To set our provider we use the following block:
1
2
3
4
5
provider "aws" {
  region = "us-east-1"
  access_key = "<YOUR-ACCESS-KEY>"
  secret_key = "<YOUR-SECRET-KEY>"
}
Danger: It is best to use a secret vault for credential based values instead of placing them directly into your
.tffile like this. For the sake of this example, we will continue as is
Please choose the region of your choice. In this example I am using us-east-1. To obtain your access_key and secret_key from the AWS console, start by heading to the “Security credentials” from the top right hand corner after clicking your username.

Scroll down to the Access Keys section of the page and click “Create access key”
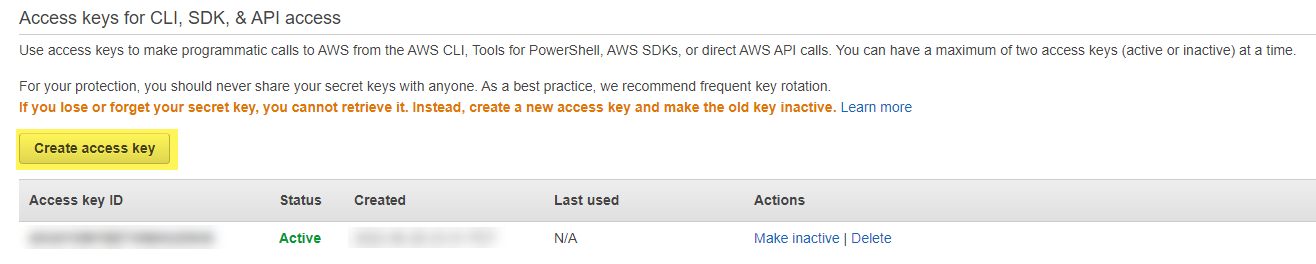
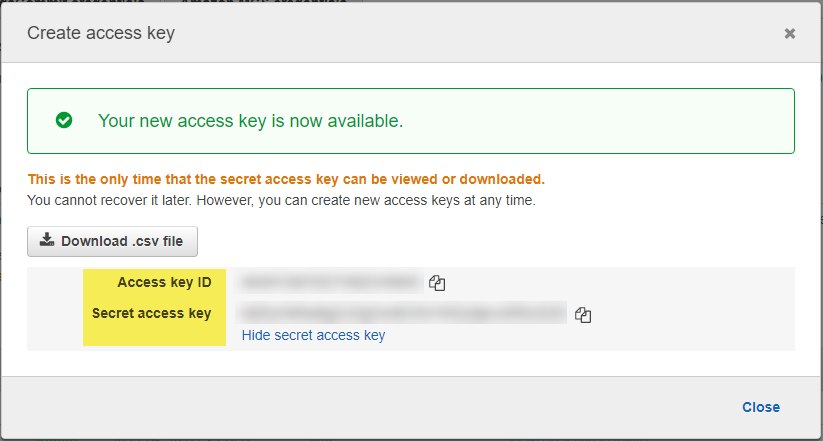
Once your access key has been created, make note of your “Access key ID”. Click on the “show secret” button and also make note of your “Secret access key”.
Now would be a good time to initialize our provider on our machine with Terraform by using the following command:
1
terraform init
After running the init command, you will see the following output:
1
2
3
4
5
6
7
8
9
10
11
12
13
14
15
16
17
18
19
20
21
22
Initializing the backend...

Initializing provider plugins...
- Finding latest version of hashicorp/aws...
- Installing hashicorp/aws v4.20.1...
- Installed hashicorp/aws v4.20.1 (signed by HashiCorp)

Terraform has created a lock file .terraform.lock.hcl to record the provider
selections it made above. Include this file in your version control repository
so that Terraform can guarantee to make the same selections by default when
you run "terraform init" in the future.

Terraform has been successfully initialized!

You may now begin working with Terraform. Try running "terraform plan" to see
any changes that are required for your infrastructure. All Terraform commands
should now work.

If you ever set or change modules or backend configuration for Terraform,
rerun this command to reinitialize your working directory. If you forget, other
commands will detect it and remind you to do so if necessary.
Create a Key Pair
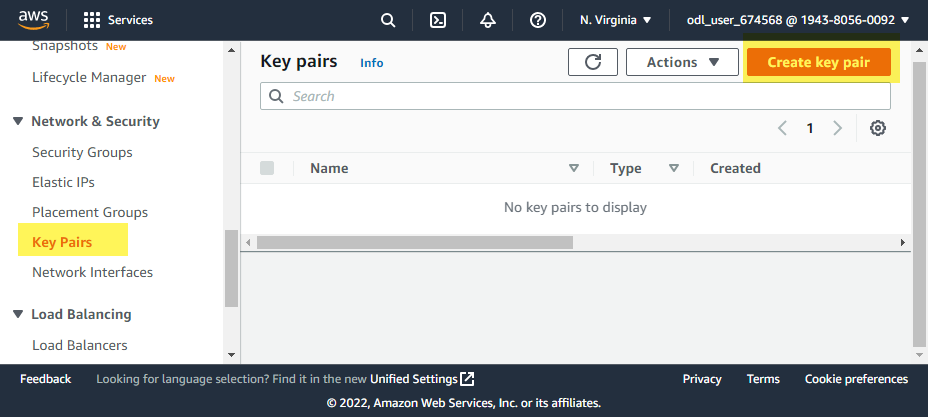
For this project, we will be standing up an EC2 instance. AWS requires us to create key pairs so that we can connect to our EC2 instance. To do this, start by heading over to the EC2 service in the AWS console. Next click on Key Pairs on the left hand panel and then Create a Key Pair in the top right hand corner.
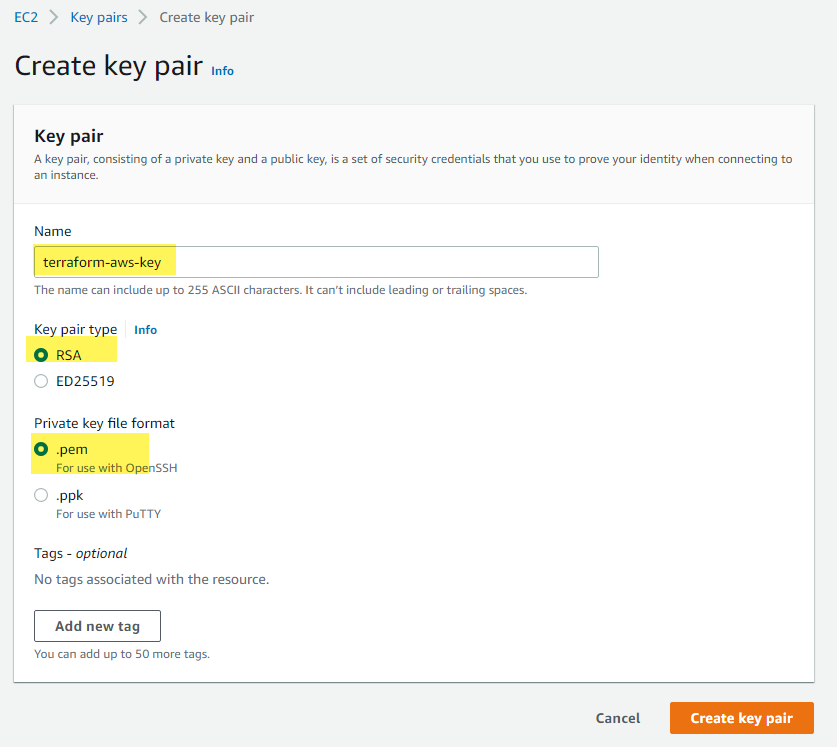
Next up we need to give our key pair a name and choose a file format. I would personally choose the pem format because it already works with both Mac and Linux, and converting it to a ppk format later is easy if you want to use it with Windows. Once you click “Create Key Pair” it will automatically download for you.
Create VPC
From here on the theme of terraform will be to define AWS resources and specifying the details on what we want that resource to be once created. The cidr_block is going to be the network we are going to define now. Later on we will be making subnets within this network CIDR (Classless Internet Domain Routing). The naming being used in these resources could be anything, but for these examples I will be using “prod” or “production”.
1
2
3
4
5
6
7
resource "aws_vpc" "prod-vpc" {
  cidr_block       = "10.0.0.0/16"
  instance_tenancy = "default"
  tags = {
    Name = "production"
  }
}
Create Internet Gateway
Now that we have already added a resouce to this terraform file, we are going to start seeing another theme surface which will be attaching new resources referrencing prior resources. The beggining of that theme starts here when we define our internet gateway. We want this gateway to be attached to the VPC we just made, so we use the following format of aws_vpc.prod-vpc.id.
1
2
3
resource "aws_internet_gateway" "gw" {
  vpc_id = aws_vpc.prod-vpc.id
}
Create a Subnet
So from the network of 10.0.0.0/16 we created in the original VPC definition, we will create a subnet within that network. The network we will create for this example will be 10.0.1.0/24. We attach it to the VPC using the aws vpc id again.
1
2
3
4
5
6
7
8
9
resource "aws_subnet" "subnet-1" {
  vpc_id     = aws_vpc.prod-vpc.id
  cidr_block = "10.0.1.0/24"
  availability_zone = "us-east-1a"

  tags = {
    Name = "prod-subnet"
  }
}
Create Custom Route Table
Once again we are going to give this resource a name. We are going to attach the route table to our VPC with the same syntax as we used for the internet gateway. Finally, we label the tag. What we are creating here is a default gate in the route table. To set the default gateway, we use the “quad zero” subnet by using 0.0.0.0/0. This default route will send all IPv4 traffic to our to our gateway. The same thing is configured for IPv6, but instead of using the “quad zero,” we will represent this in the IPv6 equivalent which is ::/0. Again, this will route all IPv6 traffic to our gateway. At this point you would think this is where we would attach our subnet and route table together, but that is not the case. Rather, we will use another AWS resource called “Route Table Association” in the next section.
1
2
3
4
5
6
7
8
9
10
11
12
13
14
15
16
17
resource "aws_route_table" "prod-route-table" {
  vpc_id = aws_vpc.prod-vpc.id

  route {
    cidr_block = "0.0.0.0/0"
    gateway_id = aws_internet_gateway.gw.id
  }

  route {
    ipv6_cidr_block        = "::/0"
    gateway_id = aws_internet_gateway.gw.id
  }

  tags = {
    Name = "production"
  }
}
Associate Subnet with Route Table
This resource is fairly self explanatory. We are going to use this to associate our subnet with our route table.
1
2
3
4
resource "aws_route_table_association" "a" {
  subnet_id      = aws_subnet.subnet-1.id
  route_table_id = aws_route_table.prod-route-table.id
}
Create Security Group to Allow Port Web Traffic and SSH
Warning: In this example project I am creating a web server that I want public facing and accessible for web traffic. I am also adding in SSH for connecting to the machine with remote access. For opening up ports in your AWS infrastructure, always have a reason and be mindful of the security risks you are exposing yourself to. This is just example.
Security group ports are nearly the equivalent to the opening of ports on your firewall at home and doing port forwarding. Here we specify what ports that we want to allow traffic in from and out to our infrastructure. In this project the end result will be a web server, therefore we want to allow HTTPS (port 443) and HTTP (port 80) which is default web traffic. As we have done before, we are naming our resources, tagging them to be easily identifable when we are viewing from the AWS console, and attaching it to our VPC resource earlier defined. Since we are configuring incoming connections, we could limit the connections to only specific IPs or networks/subnets with the cidr_blocks and ipv6_cidr_blocks. Instead of limiting these connections, we want an entirely public facing result; therefor we will once again use the “quad zero” 0.0.0.0/0 and IPv6 equivalent ::/0.
1
2
3
4
5
6
7
8
9
10
11
12
13
14
15
16
17
18
19
20
21
22
23
24
25
26
27
28
29
30
31
32
33
34
35
36
37
38
39
40
41
42
43
44
resource "aws_security_group" "allow_web" {
  name        = "allow_web_traffic"
  description = "Allow Web inbound traffic"
  vpc_id      = aws_vpc.prod-vpc.id

  ingress {
    description      = "HTTP"
    from_port        = 80
    to_port          = 80
    protocol         = "tcp"
    cidr_blocks      = ["0.0.0.0/0"]
    ipv6_cidr_blocks = ["::/0"]
  }

ingress {
    description      = "HTTPS"
    from_port        = 443
    to_port          = 443
    protocol         = "tcp"
    cidr_blocks      = ["0.0.0.0/0"]
    ipv6_cidr_blocks = ["::/0"]
  }

ingress {
    description      = "SSH"
    from_port        = 22
    to_port          = 22
    protocol         = "tcp"
    cidr_blocks      = ["0.0.0.0/0"]
    ipv6_cidr_blocks = ["::/0"]
  }

  egress {
    from_port        = 0
    to_port          = 0
    protocol         = "-1"
    cidr_blocks      = ["0.0.0.0/0"]
    ipv6_cidr_blocks = ["::/0"]
  }

  tags = {
    Name = "allow_web_also_ssh"
  }
}
Create a Network Interface with an IP in the Subnet
So we have a lot of the networking set up at this point. We want to setup an IP that we are going to be using in this subnet with a NIC that we can later attach to an EC2 instance for our webserver. As always he call in the AWS resource we will use, network interface in this case, and give it a name. Next we attach the nic to prior resouces we defined such as the subnet and security group. Additionally, we are going to go with the IP address of 10.0.1.50.
1
2
3
4
5
resource "aws_network_interface" "web-server-nic" {
  subnet_id       = aws_subnet.subnet-1.id
  private_ips     = ["10.0.1.50"]
  security_groups = [aws_security_group.allow_web.id]
}
Assign an Elastic IP to the Network Interface
If we were to spin up our EC2 instance right now as is, we would get an IP address for our subnet and networking would work. However, we want a little more control of this aspect in this project. To achieve the control we are looking for, we will set an Elastic IP. An Elastic IP address is a static public IPv4 address associated with your AWS account in a specific Region. Unlike an auto-assigned public IP address, an Elastic IP address is preserved after you stop and start your instance in a virtual private cloud (VPC).
Tip: The AWS Elastic IP relies on the deployment of the internet gateway. If you try to create this EIP in a VPC with no internet gateway then it will throw and error. The solution to this when using terraform is to specify the
depends_onand specifying theaws_internet_gateway.<YOUR-RESOURCE-NAME>.
1
2
3
4
5
6
7
8
resource "aws_eip" "one" {
  vpc                       = true
  network_interface         = aws_network_interface.web-server-nic.id
  associate_with_private_ip = "10.0.1.50"
  depends_on = [
    aws_internet_gateway.gw
  ]
}
Create Debian Server then Install and Enable Apache2
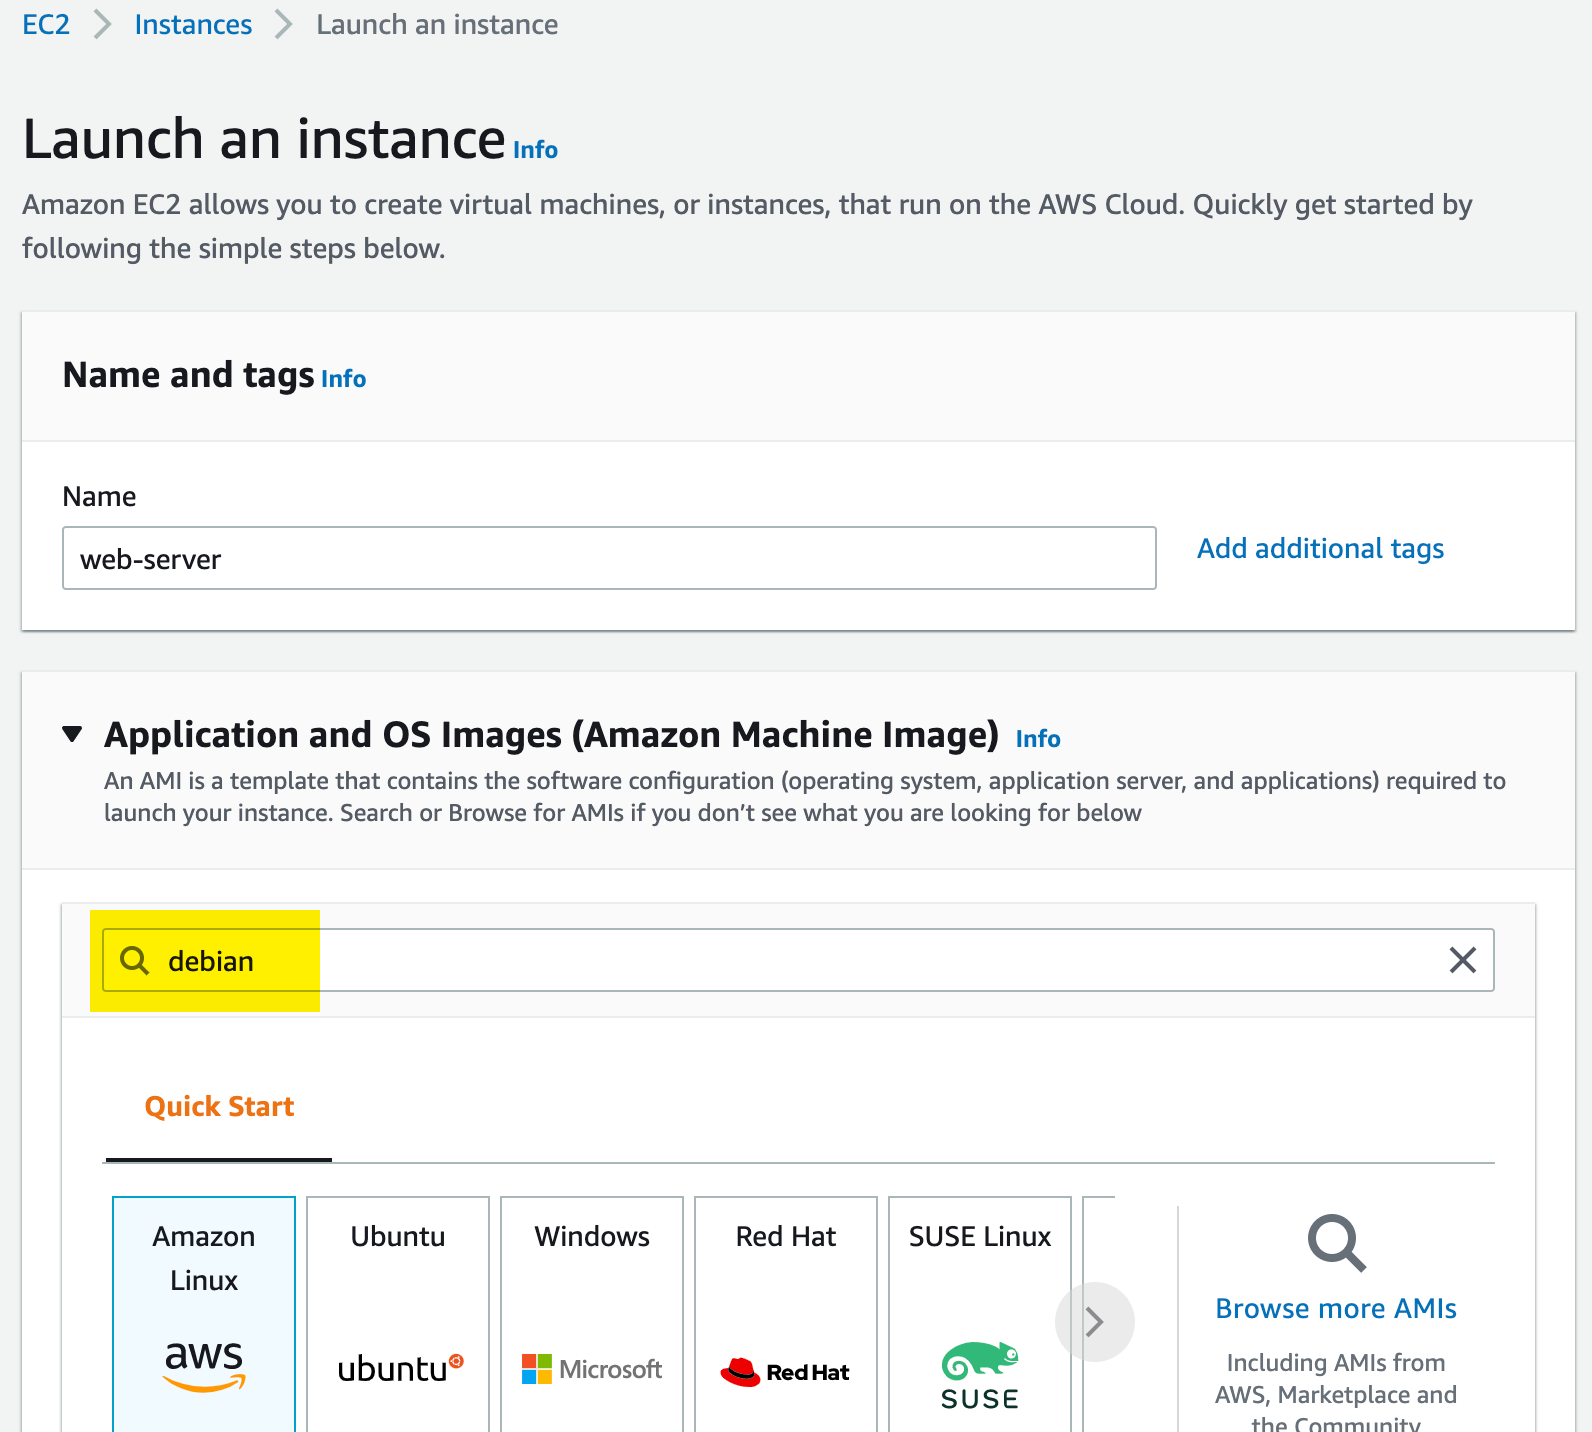
Finally we have our networking the way we want it. The fun part of creating our actual webserver is here! A big piece of this part is specifing the AMI (Amazon Machine Image). We want to use a Debian instance to house our web server and this can be done by finding the correct AMI ID. It’s important to check that the AMI ID you are choosing is correct because the AMI IDs supplied by Amazon are subject to change if you will be using theirs. To find the most up to date ID, open up the AWS console, then navigate to the EC2 service, click launch an instance from the top right hand corner of the screen, type “debian” in the search bar and press the enter key.
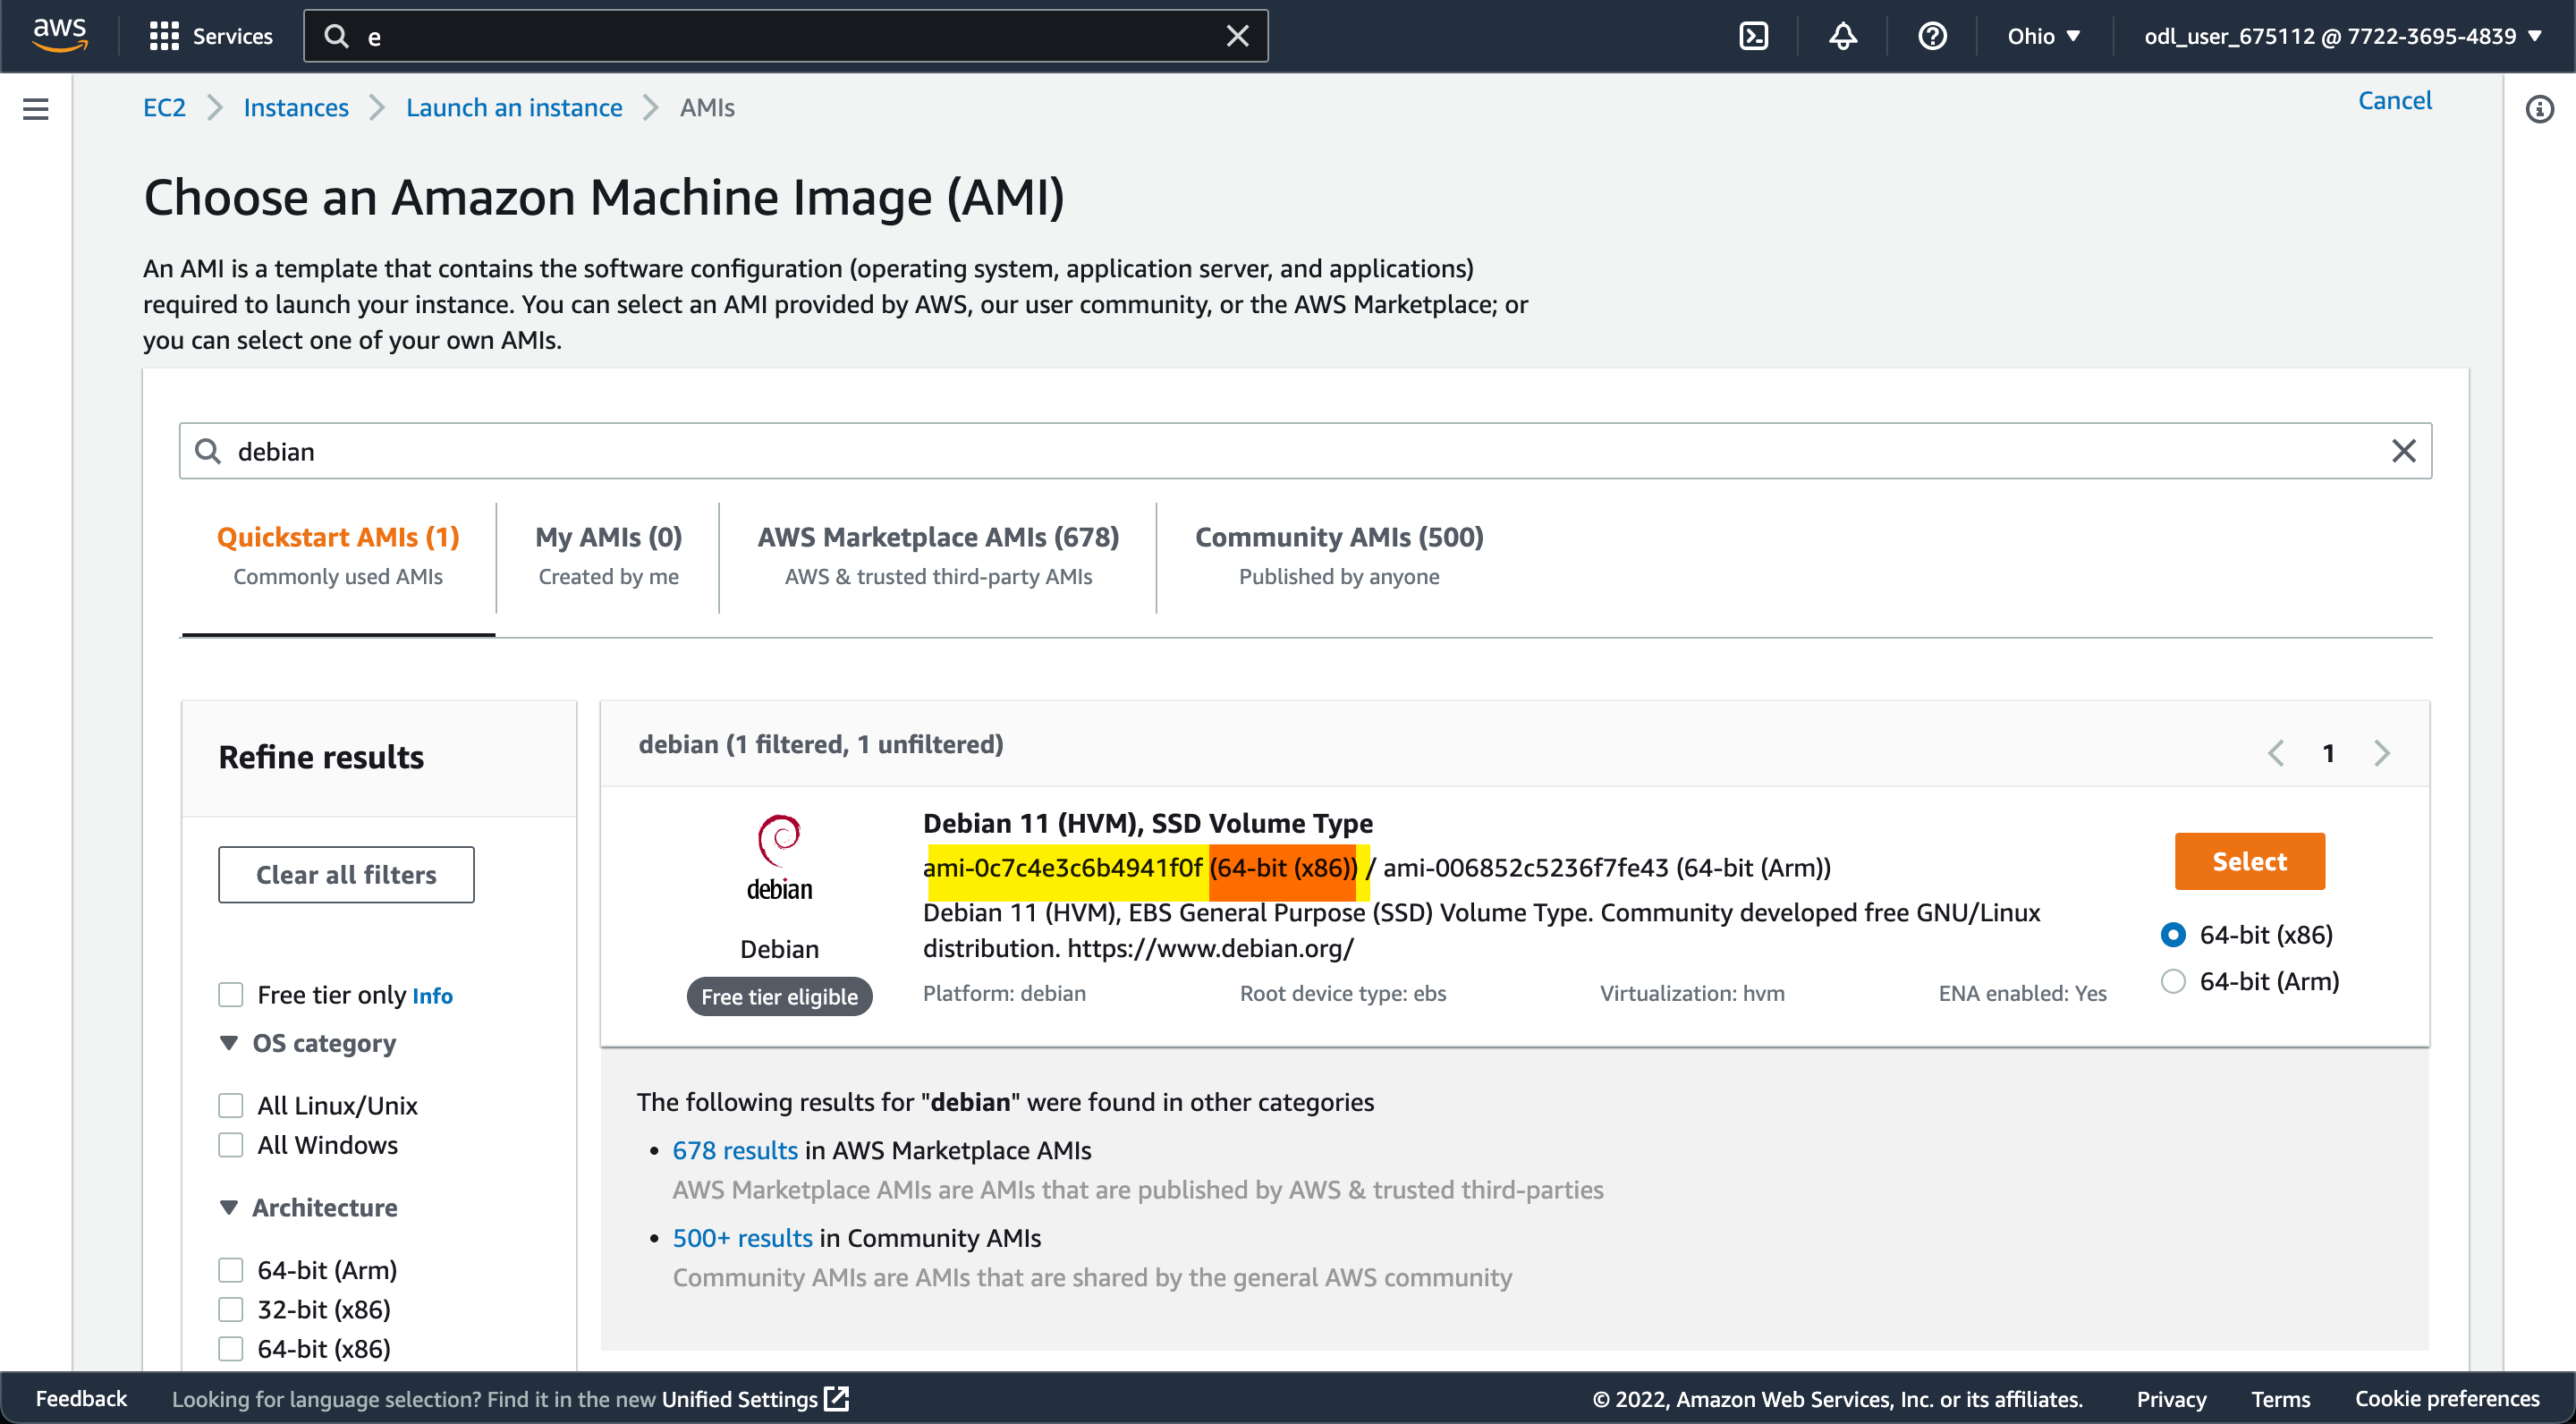
The results of AMIs supplied by amazon should appear with Amazon’s latest Debian version. Here is where you will see two AMI IDs. One is for the x86 architecture while the other is an ARM architecture. We will be using the x86 for this project. On top of choosing the correct architecture, as always doing anything in the AWS console, make sure that you are doing all of these actions in the intended region you plan to deploy your infrastructure in. You can search for Debian in the Amazon catalog and the “correct” AMI will be the result. However, the AMI IDs are different for the same “Debian” across different regions.
Note: Choose the correct AMI ID!
Since this project is simply for going through the basics of terraform and we are only using a basic web server as an example, we do not need a lot of performance and power here. The free-tier instance type of t2.micro will be perfect for this situation. We will attach the key pair we made at the beggining of this post so that we can use the .pem file we downloaded earlier to now access the EC2 instance using SSH and remotely through the port 22 we opened earlier in the security group. We will also attach the NIC we created and configured earlier with the Elasitc IP. Last but not least, we are going to have terraform perform some commands automatically on startup of our EC2 instance by having it update our package manager aptitude, install apache2 and auto approve the prompt, start the daemon using systemd, and then overwrite our starting index.html file with our super basic “This is my webserver” text.
1
2
3
4
5
6
7
8
9
10
11
12
13
14
15
16
17
18
19
20
21
22
23
resource "aws_instance" "web-server-instance" {
  ami           = "ami-07d02ee1eeb0c996c"
  instance_type = "t2.micro"
  availability_zone = "us-east-1a"
  key_name = "terraform-aws-key"

  network_interface {
    device_index = 0
    network_interface_id = aws_network_interface.web-server-nic.id
  }

  user_data = <<-EOF
        #!/bin/bash
        sudo apt update -y
        sudo apt install apache2 -y
        sudo systemctl start apache2
        sudo bash -c 'echo This is my webserver > /var/www/html/index.html'
        EOF

  tags = {
    Name = "web-server-instance"
  }
}
Terraform Plan
All the pieces are in place. Now it’s time to start watching the magic happen with the following command:
1
terraform plan
This will go through a dry run of what changes will be implemented if the current start of our terraform file will be deployed based on what the existing state of current infrastructure is. At the moment, since we have not deployed anything yet, we will see the following output:
1
Plan: 9 to add, 0 to change, 0 to destroy.
Terraform Apply
Everything is looking good! I can review than pending changes and send it on it’s way when I am satisfied with the following command:
1
terraform apply
You will once again be prompted of the changes and a detailed list of those changes to once again review. A manual user input is required to continue by entering “yes”.
1
2
3
4
5
6
7
Plan: 9 to add, 0 to change, 0 to destroy.

Do you want to perform these actions?
  Terraform will perform the actions described above.
  Only 'yes' will be accepted to approve.

  Enter a value:
The following output will result in a successful deploy of our AWS infrastructure defined in our terraform.
1
2
3
4
5
6
7
8
9
10
11
12
13
14
15
16
17
18
19
20
21
22
aws_vpc.prod-vpc: Creating...
aws_vpc.prod-vpc: Creation complete after 2s [id=vpc-01477f886e172762b]
aws_internet_gateway.gw: Creating...
aws_subnet.subnet-1: Creating...
aws_security_group.allow_web: Creating...
aws_internet_gateway.gw: Creation complete after 1s [id=igw-0e4d81991a308a8a2]
aws_route_table.prod-route-table: Creating...
aws_subnet.subnet-1: Creation complete after 1s [id=subnet-0480fd0a6ab8e5593]
aws_route_table.prod-route-table: Creation complete after 2s [id=rtb-0b7d8e33ef8f17370]
aws_route_table_association.a: Creating...
aws_route_table_association.a: Creation complete after 1s [id=rtbassoc-0969419db4a5db64a]
aws_security_group.allow_web: Creation complete after 4s [id=sg-041a669fc2ae109b4]
aws_network_interface.web-server-nic: Creating...
aws_network_interface.web-server-nic: Creation complete after 1s [id=eni-07a1016a60e537708]
aws_eip.one: Creating...
aws_instance.web-server-instance: Creating...
aws_eip.one: Creation complete after 2s [id=eipalloc-09f476c9598eb40bb]
aws_instance.web-server-instance: Still creating... [10s elapsed]
aws_instance.web-server-instance: Still creating... [20s elapsed]
aws_instance.web-server-instance: Creation complete after 24s [id=i-037bdb9db1dcedfad]

Apply complete! Resources: 9 added, 0 changed, 0 destroyed.
Checking the Results
Now our terraform is setup to configure our AWS innfrastructure exactly how we want it. It will take only a few moments to configure and it will all be deployed automatically. Best of all our environment will be exactly the same each time without errors (unless of course if you made any mistakes in the .tf file itself).
We can view the results on the AWS Console.
Info: This EC2 instance and the AWS Account are only temporary. This information will not be used by me in the time of publishing.

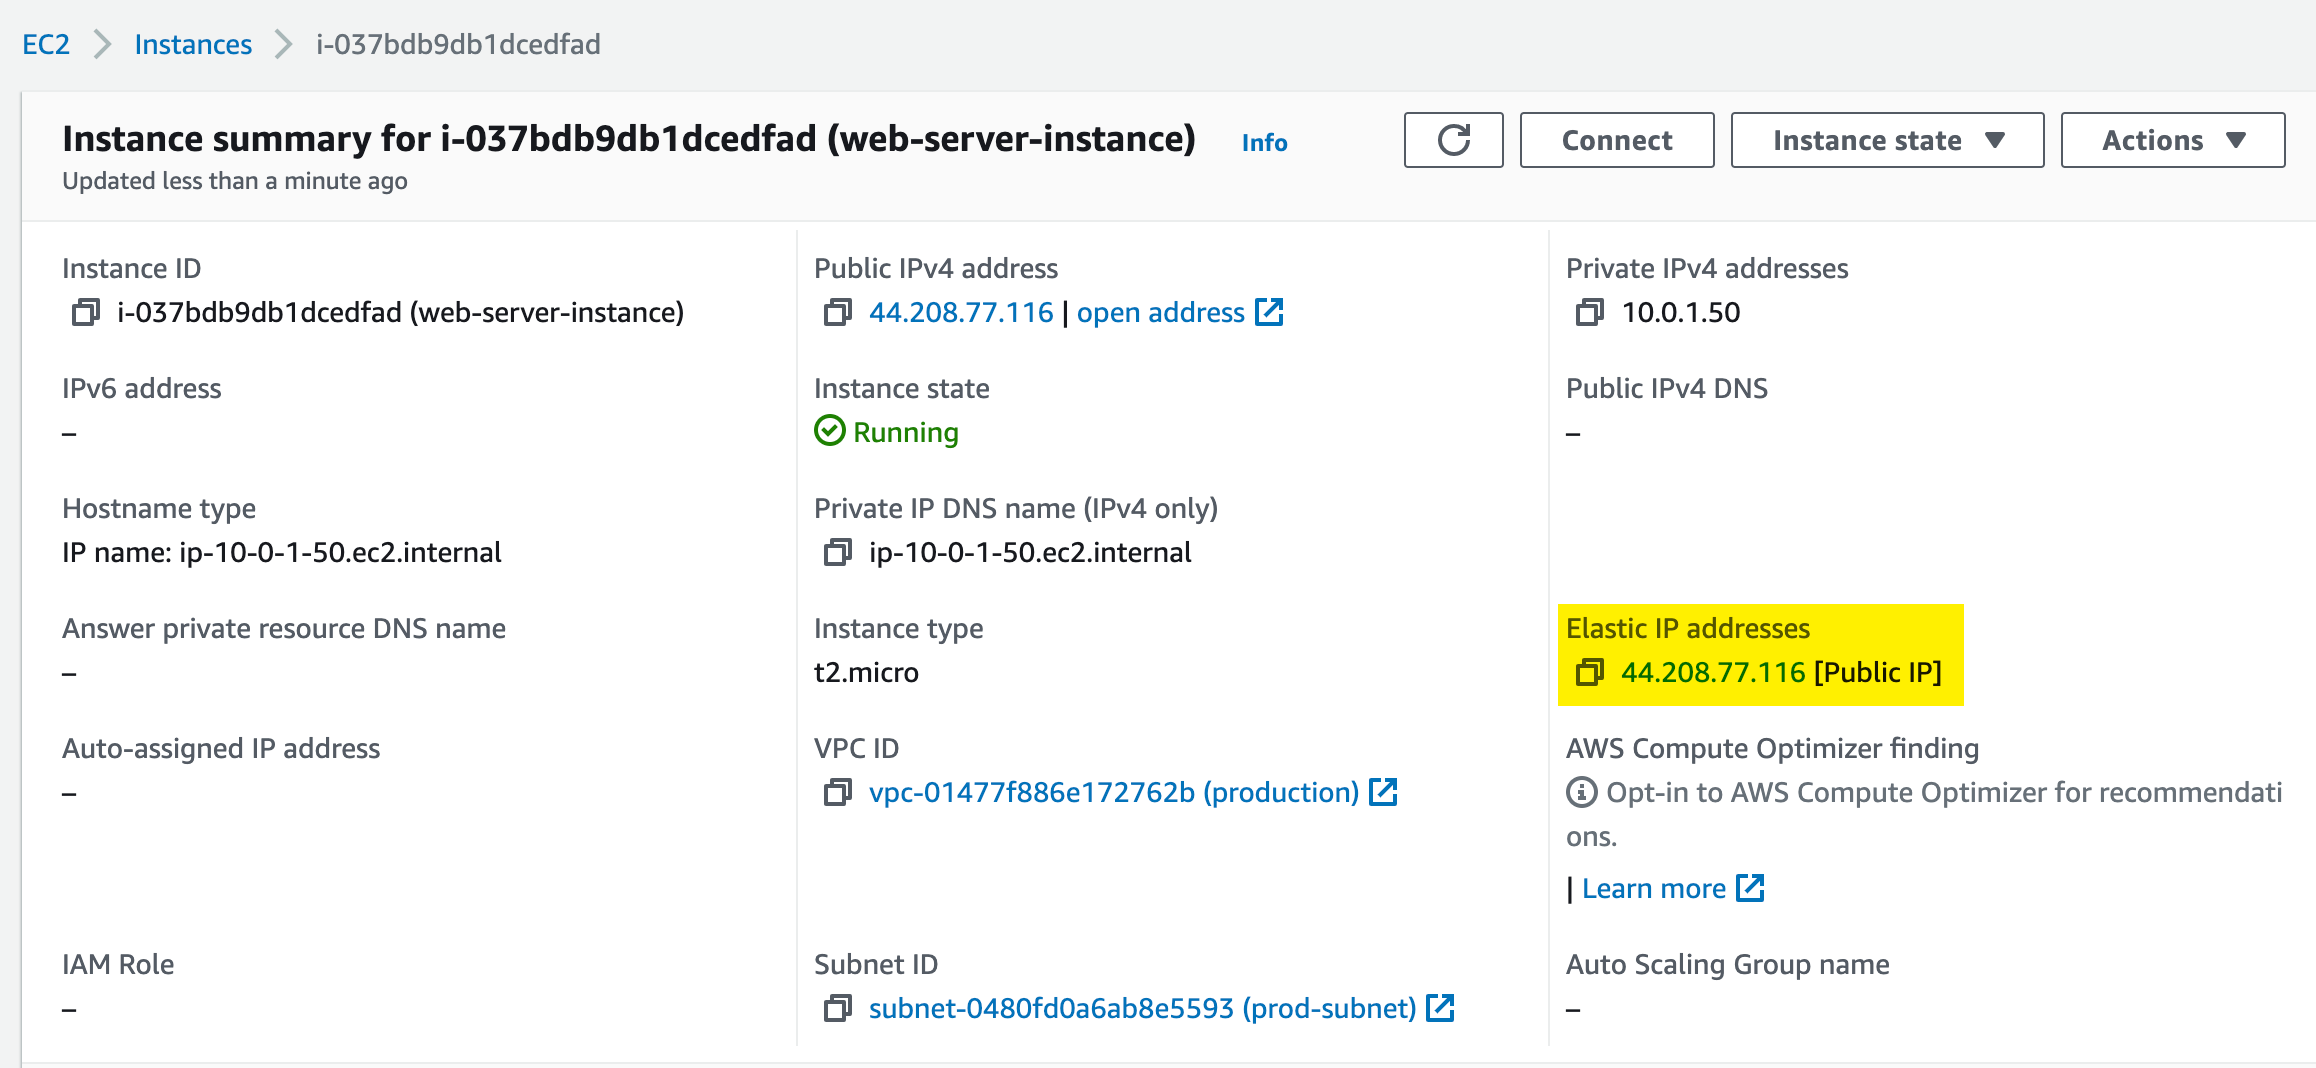
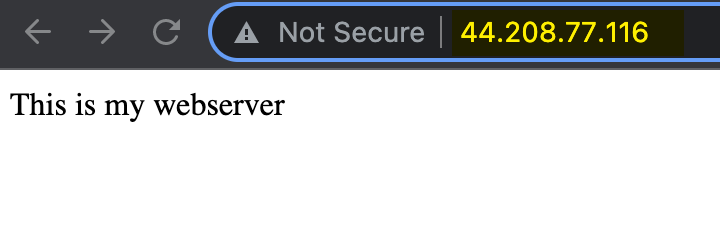
We can test the result by visiting the public IP Elastic IP that was assigned.
Terraform Destory
Of course what goes up, must come down. Well, not “must”; but if you need to tear down everything that was just deployed using terraform, we can use the following command to spin down the infrastructure.
1
terraform destroy
You will a detailed list of all the resources that will destroyed with this command. If everything looks as desired, a manual entry of the keyword “yes” will be required.
1
2
3
4
5
6
7
Plan: 0 to add, 0 to change, 9 to destroy.

Do you really want to destroy all resources?
  Terraform will destroy all your managed infrastructure, as shown above.
  There is no undo. Only 'yes' will be accepted to confirm.

  Enter a value:
After tying “yes” and pressing enter, you will see the following output that your resources were successfully destroyed.
1
2
3
4
5
6
7
8
9
10
11
12
13
14
15
16
17
18
19
20
21
22
23
aws_route_table_association.a: Destroying... [id=rtbassoc-0969419db4a5db64a]
aws_eip.one: Destroying... [id=eipalloc-09f476c9598eb40bb]
aws_instance.web-server-instance: Destroying... [id=i-037bdb9db1dcedfad]
aws_route_table_association.a: Destruction complete after 0s
aws_route_table.prod-route-table: Destroying... [id=rtb-0b7d8e33ef8f17370]
aws_route_table.prod-route-table: Destruction complete after 1s
aws_eip.one: Destruction complete after 2s
aws_internet_gateway.gw: Destroying... [id=igw-0e4d81991a308a8a2]
aws_internet_gateway.gw: Destruction complete after 1s
aws_instance.web-server-instance: Still destroying... [id=i-037bdb9db1dcedfad, 10s elapsed]
aws_instance.web-server-instance: Still destroying... [id=i-037bdb9db1dcedfad, 20s elapsed]
aws_instance.web-server-instance: Still destroying... [id=i-037bdb9db1dcedfad, 30s elapsed]
aws_instance.web-server-instance: Destruction complete after 31s
aws_network_interface.web-server-nic: Destroying... [id=eni-07a1016a60e537708]
aws_network_interface.web-server-nic: Destruction complete after 0s
aws_subnet.subnet-1: Destroying... [id=subnet-0480fd0a6ab8e5593]
aws_security_group.allow_web: Destroying... [id=sg-041a669fc2ae109b4]
aws_subnet.subnet-1: Destruction complete after 1s
aws_security_group.allow_web: Destruction complete after 1s
aws_vpc.prod-vpc: Destroying... [id=vpc-01477f886e172762b]
aws_vpc.prod-vpc: Destruction complete after 1s

Destroy complete! Resources: 9 destroyed.
Completed main.tf File
At the end of all this, your main.tf file will come together to look like the following:
main.tf
1
2
3
4
5
6
7
8
9
10
11
12
13
14
15
16
17
18
19
20
21
22
23
24
25
26
27
28
29
30
31
32
33
34
35
36
37
38
39
40
41
42
43
44
45
46
47
48
49
50
51
52
53
54
55
56
57
58
59
60
61
62
63
64
65
66
67
68
69
70
71
72
73
74
75
76
77
78
79
80
81
82
83
84
85
86
87
88
89
90
91
92
93
94
95
96
97
98
99
100
101
102
103
104
105
106
107
108
109
110
111
112
113
114
115
116
117
118
119
120
121
122
123
124
125
126
127
128
129
130
131
132
133
134
provider "aws" {
  region = "us-east-1"
  access_key = "<YOUR-ACCESS-KEY>"
  secret_key = "<YOUR-SECRET-KEY>"
}

resource "aws_vpc" "prod-vpc" {
  cidr_block       = "10.0.0.0/16"
  instance_tenancy = "default"
  tags = {
    Name = "production"
  }
}

resource "aws_internet_gateway" "gw" {
  vpc_id = aws_vpc.prod-vpc.id
}

resource "aws_subnet" "subnet-1" {
  vpc_id     = aws_vpc.prod-vpc.id
  cidr_block = "10.0.1.0/24"
  availability_zone = "us-east-1a"

  tags = {
    Name = "prod-subnet"
  }
}

resource "aws_route_table" "prod-route-table" {
  vpc_id = aws_vpc.prod-vpc.id

  route {
    cidr_block = "0.0.0.0/0"
    gateway_id = aws_internet_gateway.gw.id
  }

  route {
    ipv6_cidr_block        = "::/0"
    gateway_id = aws_internet_gateway.gw.id
  }

  tags = {
    Name = "production"
  }
}

resource "aws_route_table_association" "a" {
  subnet_id      = aws_subnet.subnet-1.id
  route_table_id = aws_route_table.prod-route-table.id
}

resource "aws_security_group" "allow_web" {
  name        = "allow_web_traffic"
  description = "Allow Web inbound traffic"
  vpc_id      = aws_vpc.prod-vpc.id

  ingress {
    description      = "HTTP"
    from_port        = 80
    to_port          = 80
    protocol         = "tcp"
    cidr_blocks      = ["0.0.0.0/0"]
    ipv6_cidr_blocks = ["::/0"]
  }

ingress {
    description      = "HTTPS"
    from_port        = 443
    to_port          = 443
    protocol         = "tcp"
    cidr_blocks      = ["0.0.0.0/0"]
    ipv6_cidr_blocks = ["::/0"]
  }

ingress {
    description      = "SSH"
    from_port        = 22
    to_port          = 22
    protocol         = "tcp"
    cidr_blocks      = ["0.0.0.0/0"]
    ipv6_cidr_blocks = ["::/0"]
  }

  egress {
    from_port        = 0
    to_port          = 0
    protocol         = "-1"
    cidr_blocks      = ["0.0.0.0/0"]
    ipv6_cidr_blocks = ["::/0"]
  }

  tags = {
    Name = "allow_web_also_ssh"
  }
}

resource "aws_network_interface" "web-server-nic" {
  subnet_id       = aws_subnet.subnet-1.id
  private_ips     = ["10.0.1.50"]
  security_groups = [aws_security_group.allow_web.id]
}

resource "aws_eip" "one" {
  vpc                       = true
  network_interface         = aws_network_interface.web-server-nic.id
  associate_with_private_ip = "10.0.1.50"
  depends_on = [
    aws_internet_gateway.gw
  ]
}

resource "aws_instance" "web-server-instance" {
  ami           = "ami-07d02ee1eeb0c996c"
  instance_type = "t2.micro"
  availability_zone = "us-east-1a"
  key_name = "terraform-aws-key"

  network_interface {
    device_index = 0
    network_interface_id = aws_network_interface.web-server-nic.id
  }

  user_data = <<-EOF
        #!/bin/bash
        sudo apt update -y
        sudo apt install apache2 -y
        sudo systemctl start apache2
        sudo bash -c 'echo This is my webserver > /var/www/html/index.html'
        EOF

  tags = {
    Name = "web-server-instance"
  }
}