
Cloud-Init is the de facto multi-distribution package that handles early initialization of a virtual machine instance. When the VM starts for the first time, the Cloud-Init software inside the VM will apply those settings.
Proxmox templates together with Cloud-Init can be used to quickly deploy new VMs. A template quickly creates a new VM and Cloud-Init will initialize the new VM so that you only have to set the host name and the initial user account. No more installing the operating system from scratch for every new VM. In this guide, I’m describing how to do this with Debian to spin up headless Debian servers.
Debian doesn’t provide a special image for this use case, but the Debian images designed for OpenStack/Cloud come with Cloud-Init support. Check out the Proxmox’s documentation for details on how Proxmox’s Cloud-Init support works.
Table of Contents
Download a base Debian cloud image
We need to download the .qcow2 image file and that can be done from the following command:
1
wget https://cloud.debian.org/images/cloud/bullseye/20220613-1045/debian-11-genericcloud-amd64-20220613-1045.qcow2
You will see the following output after running the command.
1
2
3
4
5
6
7
8
9
10
11
12
13
14
15
16
17
18
brandon@ProxMox:~# wget https://cloud.debian.org/images/cloud/bullseye/20220613-1045/debian-11-genericcloud-amd64-20220613-1045.qcow2
--2022-06-17 19:51:13--  https://cloud.debian.org/images/cloud/bullseye/20220613-1045/debian-11-genericcloud-amd64-20220613-1045.qcow2
Resolving cloud.debian.org (cloud.debian.org)... 194.71.11.173, 194.71.11.165, 194.71.11.163, ...
Connecting to cloud.debian.org (cloud.debian.org)|194.71.11.173|:443... connected.
HTTP request sent, awaiting response... 302 Found
Location: https://laotzu.ftp.acc.umu.se/images/cloud/bullseye/20220613-1045/debian-11-genericcloud-amd64-20220613-1045.qcow2 [following]
--2022-06-17 19:51:15--  https://laotzu.ftp.acc.umu.se/images/cloud/bullseye/20220613-1045/debian-11-genericcloud-amd64-20220613-1045.qcow2
Resolving laotzu.ftp.acc.umu.se (laotzu.ftp.acc.umu.se)... 194.71.11.166, 2001:6b0:19::166
Connecting to laotzu.ftp.acc.umu.se (laotzu.ftp.acc.umu.se)|194.71.11.166|:443... connected.
HTTP request sent, awaiting response... 200 OK
Length: 253231104 (242M)
Saving to: ‘debian-11-genericcloud-amd64-20220613-1045.qcow2’

debian-11-genericcloud-a 100%[===============================>] 241.50M  14.1MB/s    in 19s

2022-06-17 19:51:37 (12.6 MB/s) - ‘debian-11-genericcloud-amd64-20220613-1045.qcow2’ saved [253231104/253231104]

brandon@ProxMox:~#
How to get the latest link to use with wget
To be more specific on how we got the command to use from above, I will show you how to find the latest version of the Debian Cloud Image to use.
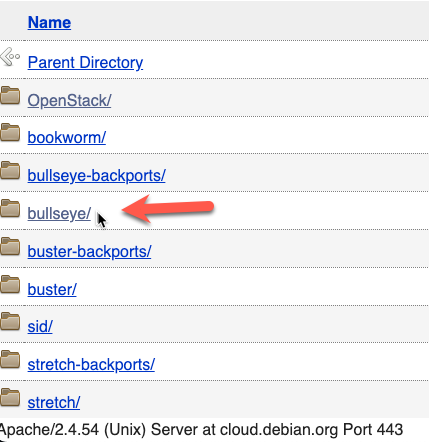
Start by visiting the Debian Official Cloud Images page. The version I want to work with is Bullseye because this is the Debian 11 version and most current.
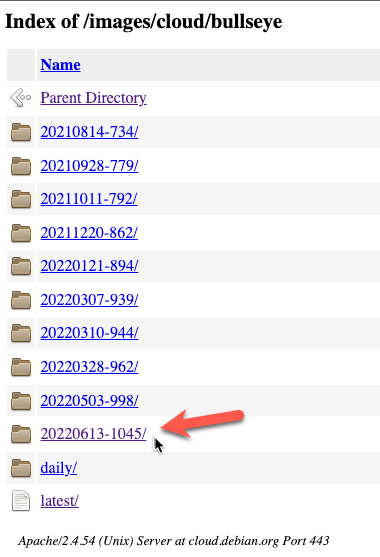
Next click on the current version of the images which for me is 20220613-1045/
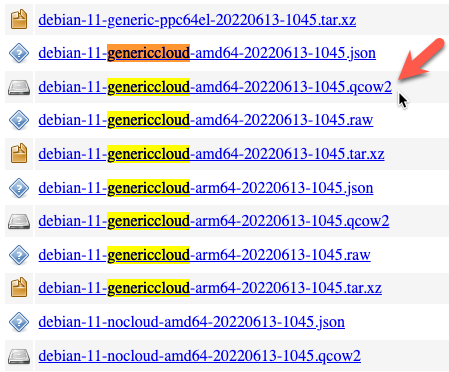
Then choose the .qcow2 image and copy the link address by right clicking it. Paste that after the wget command in your ProxMox host.
How to download an image directly to ProxMox server
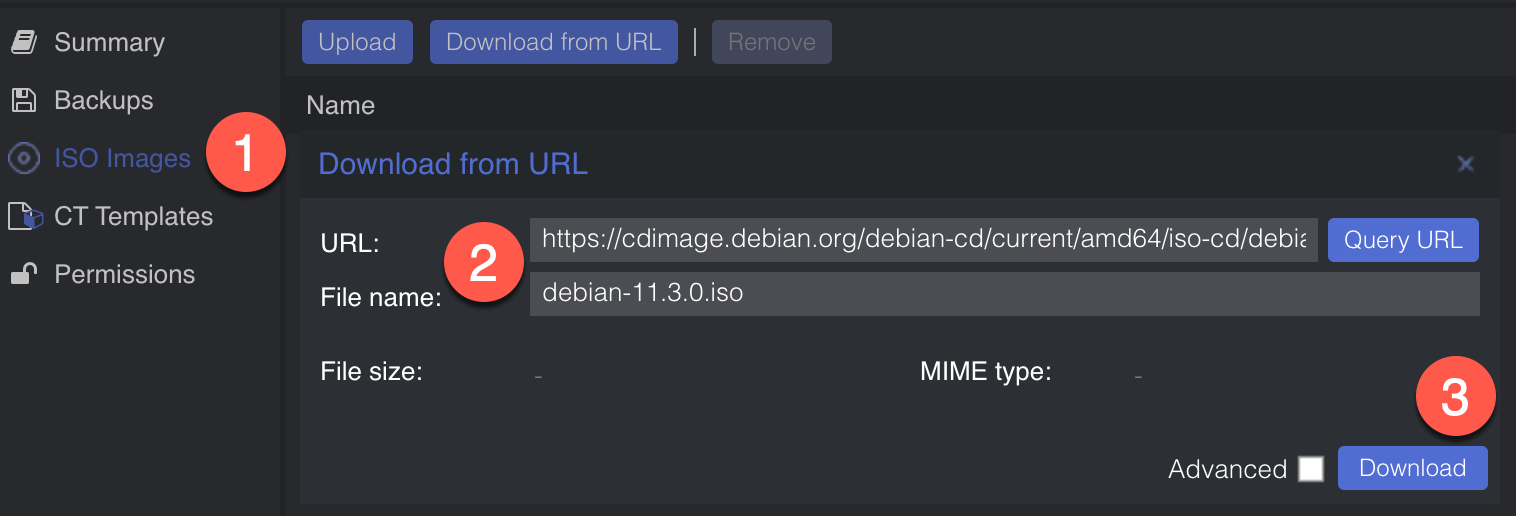
Additionally you can also use a feature in newer versions of ProxMox that will download from a link directly and then automatically add that image to the correct (/var/lib/vz/template/iso/) directory ProxMox checks in with during creation of a VM so will it appear on the list of image options. This is not strictly for the process we are working on right now, and can be used for simple regular Debian base images, or etc.
You see the following output upon success:
1
2
3
4
5
6
7
8
9
10
11
12
13
14
15
16
17
18
19
20
21
22
23
24
25
26
27
downloading https://cdimage.debian.org/debian-cd/current/amd64/iso-cd/debian-11.3.0-amd64-netinst.iso to /var/lib/vz/template/iso/debian-11.3.0-amd64-netinst.iso
--2022-06-03 16:39:41--  https://cdimage.debian.org/debian-cd/current/amd64/iso-cd/debian-11.3.0-amd64-netinst.iso
Resolving cdimage.debian.org (cdimage.debian.org)... 194.71.11.173, 194.71.11.165, 194.71.11.163, ...
Connecting to cdimage.debian.org (cdimage.debian.org)|194.71.11.173|:443... connected.
HTTP request sent, awaiting response... 302 Found
Location: https://laotzu.ftp.acc.umu.se/debian-cd/current/amd64/iso-cd/debian-11.3.0-amd64-netinst.iso [following]
--2022-06-03 16:39:42--  https://laotzu.ftp.acc.umu.se/debian-cd/current/amd64/iso-cd/debian-11.3.0-amd64-netinst.iso
Resolving laotzu.ftp.acc.umu.se (laotzu.ftp.acc.umu.se)... 194.71.11.166, 2001:6b0:19::166
Connecting to laotzu.ftp.acc.umu.se (laotzu.ftp.acc.umu.se)|194.71.11.166|:443... connected.
HTTP request sent, awaiting response... 200 OK
Length: 396361728 (378M) [application/x-iso9660-image]
Saving to: '/var/lib/vz/template/iso/debian-11.3.0-amd64-netinst.iso.tmp.480879'
     0K ........ ........ ........ ........  8% 8.19M 42s
 32768K ........ ........ ........ ........ 16% 13.7M 31s
 65536K ........ ........ ........ ........ 25% 13.7M 25s
 98304K ........ ........ ........ ........ 33% 12.1M 22s
131072K ........ ........ ........ ........ 42% 13.7M 18s
163840K ........ ........ ........ ........ 50% 13.8M 15s
196608K ........ ........ ........ ........ 59% 13.8M 13s
229376K ........ ........ ........ ........ 67% 11.7M 10s
262144K ........ ........ ........ ........ 76% 13.7M 7s
294912K ........ ........ ........ ........ 84% 13.8M 5s
327680K ........ ........ ........ ........ 93% 13.7M 2s
360448K ........ ........ ........ ..      100% 11.2M=30s
2022-06-03 16:40:15 (12.5 MB/s) - '/var/lib/vz/template/iso/debian-11.3.0-amd64-netinst.iso.tmp.480879' saved [396361728/396361728]
download of 'https://cdimage.debian.org/debian-cd/current/amd64/iso-cd/debian-11.3.0-amd64-netinst.iso' to '/var/lib/vz/template/iso/debian-11.3.0-amd64-netinst.iso' finished
TASK OK
Create a Proxmox VM using the image
The commands here should be relatively self explanatory but in general we are creating a VM (VMID=9500) with basic resources (2 cores, 2048MB), assigning networking to a virtio adapter on vmbr0, importing the image to storage (either local or local-lvm), setting disk 0 to use the image, setting boot drive to disk, setting the cloud init stuff to ide2 (which apparently appears as a CD-ROM to the VM, at least upon inital boot), and adding a virtual serial port.
1
2
3
4
5
6
7
8
qm create 9500 --name Debian11CloudInit --net0 virtio,bridge=vmbr0
qm importdisk 9500 debian-11-genericcloud-amd64-20220613-1045.qcow2 local-lvm
qm set 9500 --scsihw virtio-scsi-pci --scsi0 local-lvm:vm-9500-disk-0
qm set 9500 --ide2 local-lvm:cloudinit
qm set 9500 --boot c --bootdisk scsi0
qm set 9500 --serial0 socket --vga serial0
qm set 9500 --agent enabled=1 #optional but recommended
qm template 9500
Here are the details to the command as they appear:
- Create a new VM with ID 900 using VirtIO networking drivers.
- Import the qcow Debian image as a disk to the new VM. The disk will be called
local-lvm:vm-9500-disk-0. - Attach the imported disk as a VirtIO SCSI device to the VM.
- Attach a drive for the Cloud-Init config to the VM.
- Set the VM to boot from the imported disk image.
- Add a serial console to the VM, which is needed by OpenStack/ProxMox.
- Enable the qemu-guest-agent for the VM – this is an optional setting, but I do recommend it because it will be useful if you are going to be using this for something like Terraform later on to automate the creation of VMs.
- Convert the VM into a template.
Usage
To deploy a new server VM based on the template using the ID and name of your choice, execute the following command on the Proxmox host:
1
qm clone 9500 9000 --name NEW-VM
After the new VM is created, you can finish the setup in the Proxmox web interface with the following steps:
- In the Cloud-Init tab of the VM, configure the name of the default user and the public SSH key you want to use for authentication.
- In the Options tab, enable the QEMU Guest Agent if you did not from the commands above.
- In the Hardware tab, select the
scsi0hard disk and click Resize disk. The default size of the Debian image is 2 GiB. Specify the amount you want the disk to be increased by (e.g. 30 GiB for a total size of 32 GiB).
Everything is ready to go! Start the VM, run a system upgrade, and install the QEMU guest agent:
1
2
3
sudo apt update
sudo apt full-upgrade
sudo apt install qemu-guest-agent